This post may contain affiliate links. Please read my disclosure.
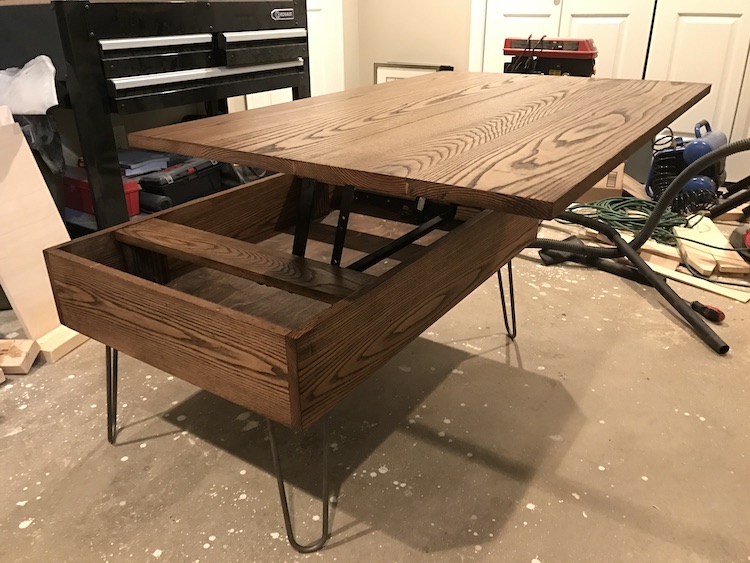
This DIY lift top coffee table can be customized to the size of your liking and will be the centerpiece for your living room.
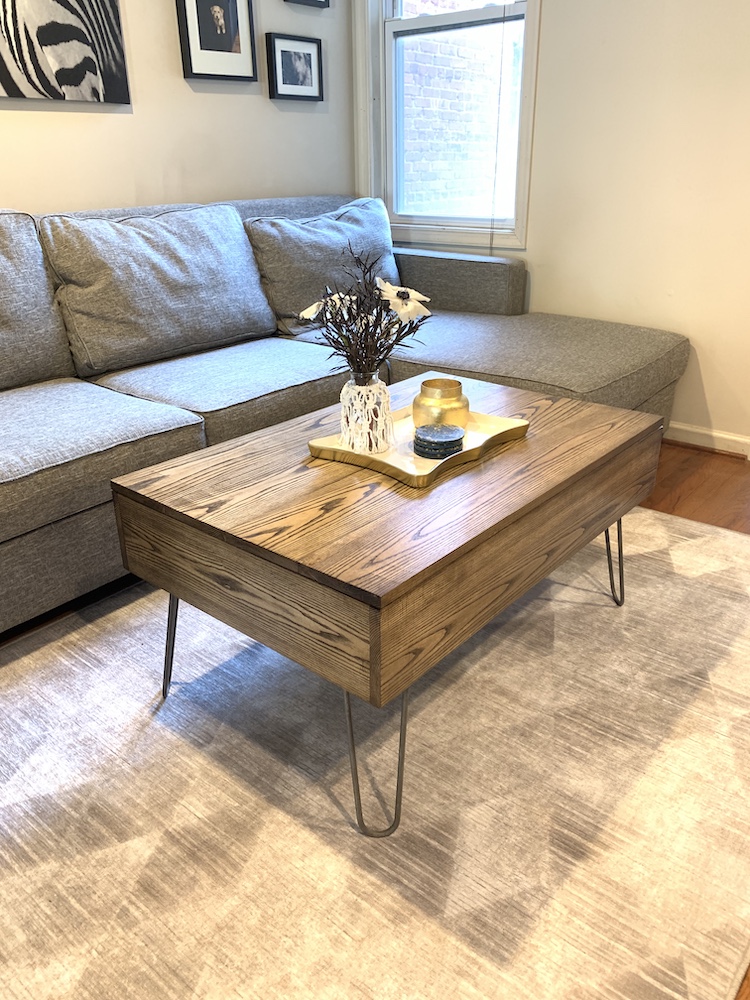
So this post is way overdue, but about a year ago, yes a year, a colleague of mine had asked if I could make her a lift top coffee table. She had an old one that she wanted to be replaced. She wondered if I could use the lift top coffee table and then build a modern one that was similar to one she liked at Amazon.
I said yes but I'm not going to lie, I was a little nervous. First of all, I had never made anything modern looking. Everything to this point had been farmhouse style. But more importantly, I had to build this coffee table from scratch. I couldn't use someone else's directions to make it. I had to design it on my own. Needless to say there was quite a bit of work involved in this but I couldn't be happier with how it turned out.
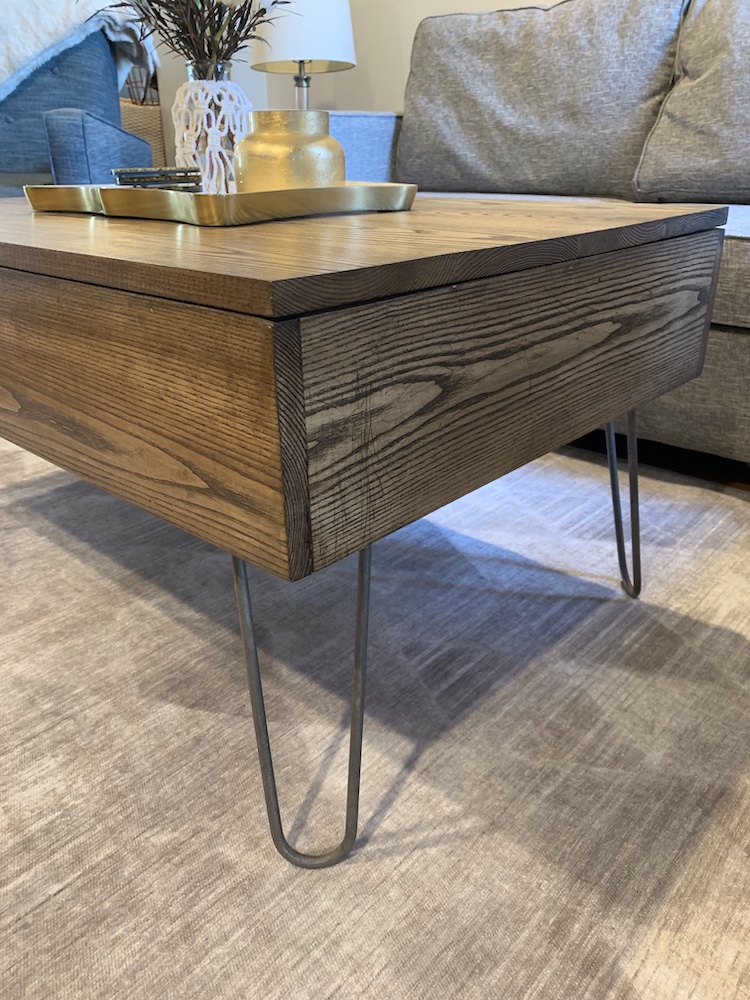
I wanted to use hardwood that I had never used before but could take stain really well, so I settle on ash. Now if you're inspired to make this yourself, you don't have to use ash but it's very important to use hardwood. The other thing is I didn't have to buy a lift top mechanism. I just used the one from her old coffee table and then build this one around it. But if you're looking for other DIY projects, check out some of my other posts.

DIY Lift Top Coffee Table Shopping List
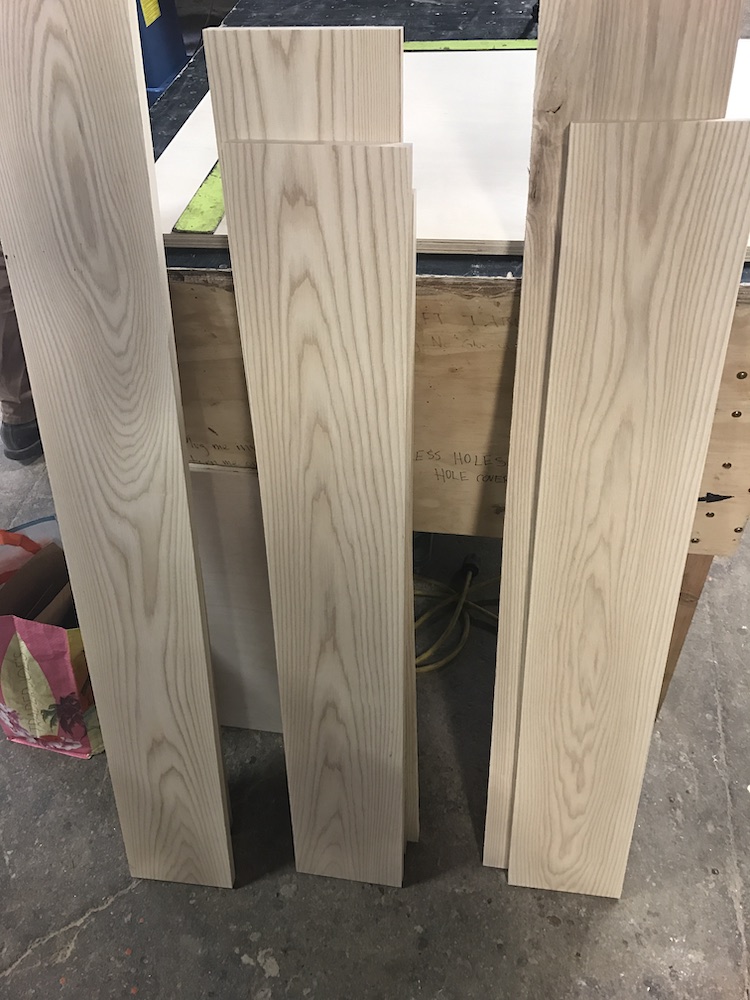
- 4 - 1x8" @ 8 ft ash
- 1 - ¾" plywood (4x4 ft)
- Wood glue
- 1 ¼″ pocket-hole screws
- 8" hairpin legs
- Lift top table mechanism
- Stain or paint
- Polyurethane
Tools
Cut List
- (6) – 1×8 @ 39″ ash
- (4) – 1x8 @ 24" ash
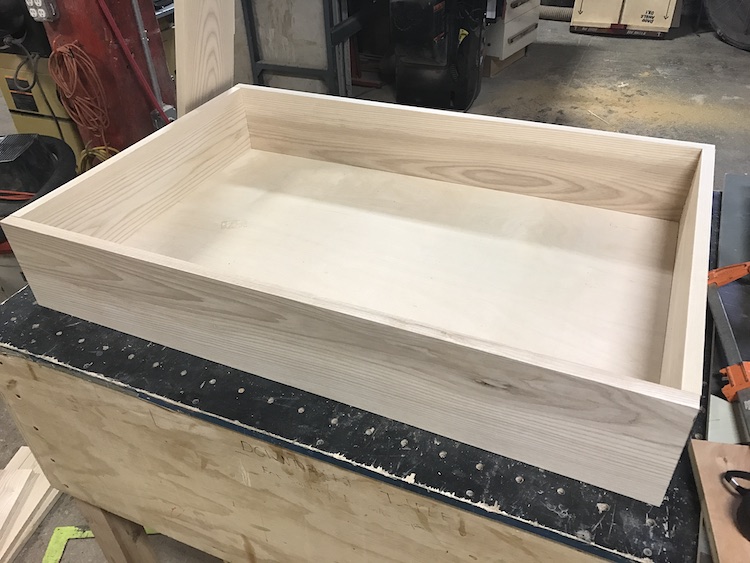
- (1) – plywood 37 ½" x 24"
How to Make a DIY Lift Top Coffee Table
Step 1:
Make all cuts listed above. If your ash isn't ¾" thick, then put through planer to make desired thickness.
Step 2:
Using table saw, cut 4 of the 39" 1x8 pieces of ash to a width of 6 ⅜". If your other 2 pieces of 39" 1x8 ash aren't at 7 ¼" wide, then cut those to 7 ¼" wide.
Step 3:
Drill pocket holes using Kreg Jig on each end of the two pieces of 1x8 @ 24" ash. Drill pocket holes in bottom of piece of plywood.
Step 4:
Place two 1x8 @ 39" ash that are 7 ¼" wide and two 1x8 @ 24" ash around plywood as plywood is floor. Using glue and pocket holes screws, put it together. Clamp for 30 minutes to make sure glue sets.
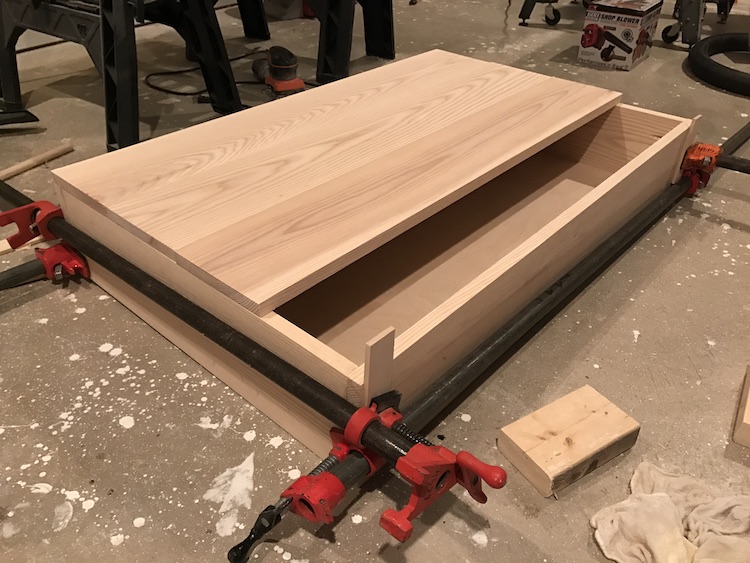
Step 5:
Place last four 1x8 @ 39" ash that are 6 ⅜" wide on top of side panels to make sure top will fit snuggly. You might have to trim a piece of wood with table saw if it doesn't line up.
Step 6:
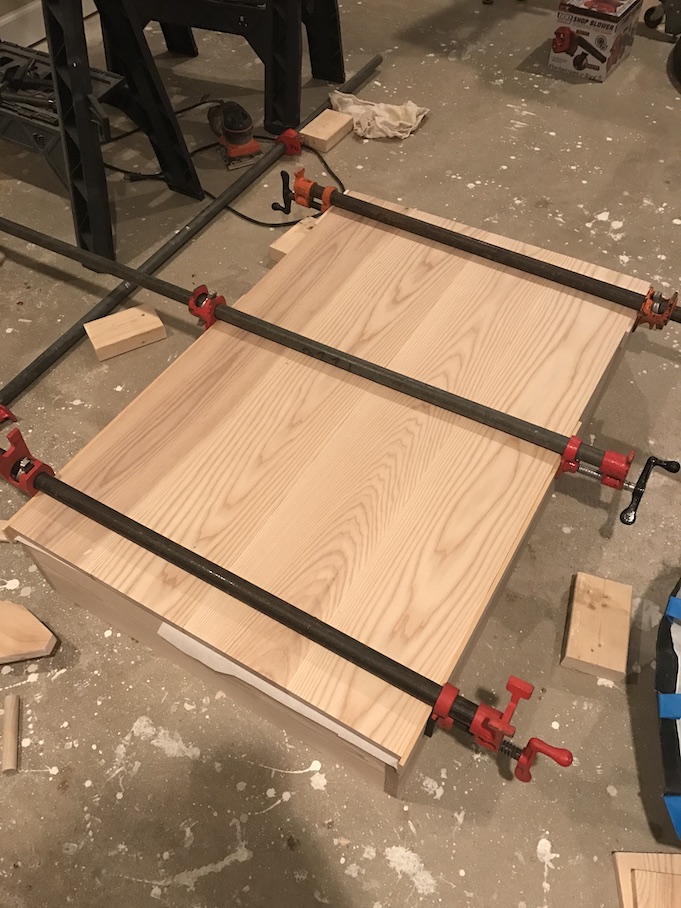
Using Kreg Jig, drill pocket holes in bottom of three pieces of 1x8 @ 39" ash. Glue and drill together and then clamp overnight.
Step 7:
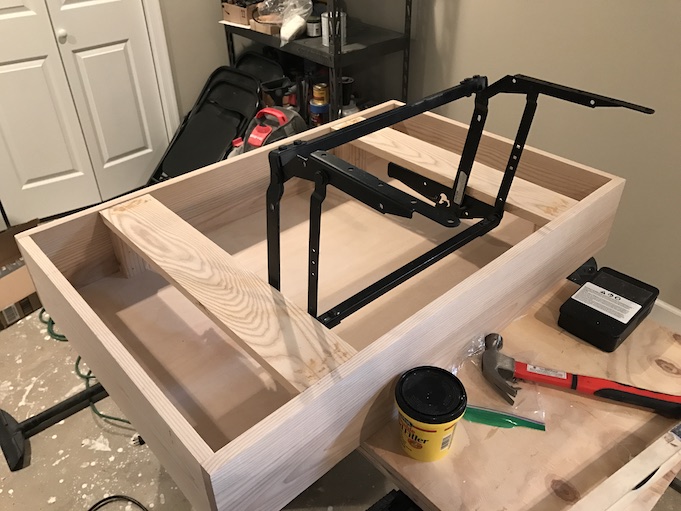
Now time to work on lift top mechanism. Each lift top is different so it depends on you you're connecting the base to the top. But with mine, I had to add two pieces of wood so it could anchor underneath the top. I used the remaining two pieces of 1x8 @ 24" ash and lined them up with the lift top mechanism. I then cut 4 pieces of 2x4 to anchor the ash underneath.
Step 8:
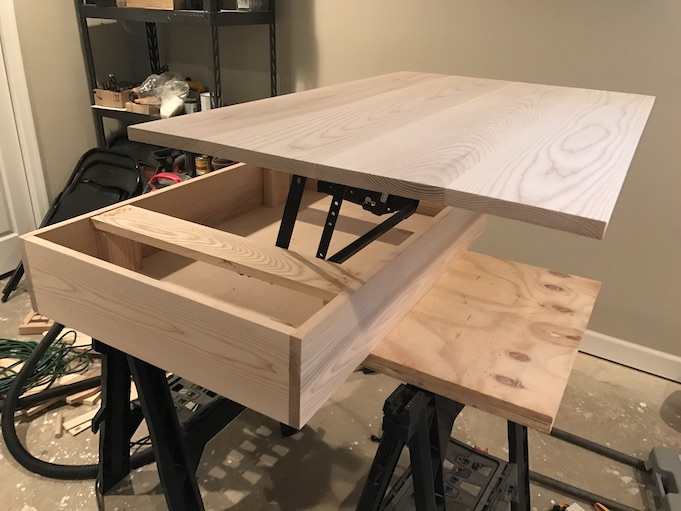
With lift top mechanism attached to base, place top piece on it and let it line up with sides. This was the most complicated part of the process. I checked about 10 times and then marked the holes to screw in. I kept lifting it and then placing it back down to make sure it lined up.
Step 9:
With everything attached, stain and polyurethane to your liking.

Sylvia Duer says
Wow, Ryan, this is really beautiful! I love the lift top design. It’s so functional. Your co-worker now has an original Ryan Masterpiece! 👍
Ryan says
Thanks! It was tough to make but loved how it turned out!
Melanie says
This is awesome Ryan!
Ryan says
Thanks Melanie! Hope you're doing well!
Jena Leigh | Naughty Kitchen says
This is DOPE Ryan! I love the color of the table. Was it just plain Ash wood with a top clear coating?
Ryan says
Yep just ash. Ash has beautiful grain that can really be highlighted. And yes I used a clear top coating.
Kyle says
Hi Ryan,
I absolutely love the table and it has inspired me to do something similar rather than buy a coffee table for my new place. I am new to using a jig and drilling pocket holes. Can you show where you ended up drilling the holes?
Thanks!
Kyle
Ryan says
Hey Kyle,
Glad this inspired you. Unfortunately I didn't take a great pic of the pocket holes but what you want to do is drill them at the edge of the two smaller boards that are the sides. It will then fit in to form the box. It is a 90 degree join. There is a video here that helps explain it!
Kyle says
Awesome! This is exactly what I was looking for thanks!
Do you feel that drilling the pocket holes on the inside of the 24" pieces gives enough strength? From what I see drilling from the outside would give more strength, but obviously I would like them hidden inside the table.
Thanks again!
Ryan says
Drilling on the inside works fine for this.
Cate says
Shouldn’t the long sides of the table be longer than the plywood since the shorter ends are on the inside? I just don’t want to make all the wrong cuts.
Ryan says
Good catch. That was a typo on my part. The plywood is 37 1/2" long to fit inside.
Cate says
Thank you for your prompt response. Looking forward to starting this project!
Issa says
Great job! I’m looking into building this since I can’t find what I want already made, this is perfect! Would it be possible to know the final dimensions of the table? L, W, H? Also, are the legs on this one really 8’’ tall? Thank you so much!
Ryan says
The table is 39" x 25.5" x 8". And yes the hairpin legs are 8" tall. This gives the table the height of 16" which is the typical height for a coffee table. Hope you have fun making one!
Alim says
Hello,
This looks great! I would like to do this myself. Is there a reason you didn't use plyboard on top and cut to size? It seems easier than having to rip 4 pieces of wood and join them together?
Thanks!
Ryan says
You can use plywood but I wanted the look of the four boards and the whole outside to all be the same type of wood.
Alim says
Okay I understand now. Your plywood wasn't the same. I am thinking of doing top and bottom in both mahogony plywood, and ripping another of the same plywood for the sides. So its all same wood. I think it would work. I wanted to clarify with you in case there was something I was missing that led you to put the four pieces together. Seems just a preference thing.
Thanks for the reply!
Juscelia veiga says
Hello Ryan
Great job! It looks really nice, I was wondering if you know how much all the material cost?
Thank you
Ryan says
I used ash wood which is a little more expensive so it was about $175 for everything.
Angela says
Hey Ryan,
This looks amazing. I am trying to find a diy project for a sit stand desk that is also aesthetically pleasing. I thought about a lift top option. Opinions on doing this for a desk? Not sure how practical it would be.
P.S. this looks amazing!
Ryan says
Thanks. For a sit stand desk it is definitely possible but I don't have directions for it. I found an example of what one could look like on Overstock.
Peter says
What part of table boards are you ripping down to 7-1/4" on the table saw? Maybe update your cut list to include final lengths and widths?
Ryan says
It is two of the 39" pieces. If they are 1x8s they should already be at 7-1/4" but if not they should be ripped down to that size. I updated the post. Let me know if you have any other questions!
Jessica says
I want to build our coffee table for the living room like this, i have 0 experience building furniture and have only basic tools such as clamps, drill, screws ect.... so i am ordering the wood from a local shop where they will cut, plane, and sand it for me...
If I want my table to be square, 3ft x 3ft, and 8 inches deep, what should i ask the exact measurements of each board to be?
Ryan says
Part of it depends on the thickness of the wood but if it is 3/4" like mine, you'd have two sides that are 36" and two that are 34.5". Then the bottom which is plywood would be 34.5" x 34.5". The top is up to you. You could have 6 pieces at 6" inches wide and 36" long or 4 pieces at 9" inches wide and 36" long. Hope that helps!
Jessica says
Okay so... the last bit confused me, so I just wanna triple check. For one solid piece it would be,
All 3/4 thick
(2) 36" long x 9 inches wide
(2) 34.5 long x 9 wide
This creates the siding..
The bottom 34.5 x 34.5
If I were to divide the top into 2 rectangles, the inside into 2 rectangle compartments I would want to do
1 more 34.5 x 9 x 3/3 and the two wooden braces for the lift table what would the measurement for those need to be?? Would that depend on the lift kit measurements
Ryan says
Exactly! And yes it depends on the lift table mechanism for the measurements.
Jessica says
Thank you a ton! You've been very very helpful !
Sally Parker Willmore says
Hi, there are two different size lift mechanisms. Which size did you use? We hope to make it this week, thank you so much for the plans!!
Ryan says
The lift top mechanism I used was from an old table so I build the size of the table around it. The ones I linked are some suggestions that could work!
Taylor says
Hi Ryan, could you share what stain and/or sealant you used please? I really like that color you wound up with.
Ryan says
I used Minwax Special Walnut stain and then some polyurethane to seal.
hak says
curious about these plans; why not use miter joints at the corners of the table body?
Ryan says
That can be done as well.