This post may contain affiliate links. Please read my disclosure.
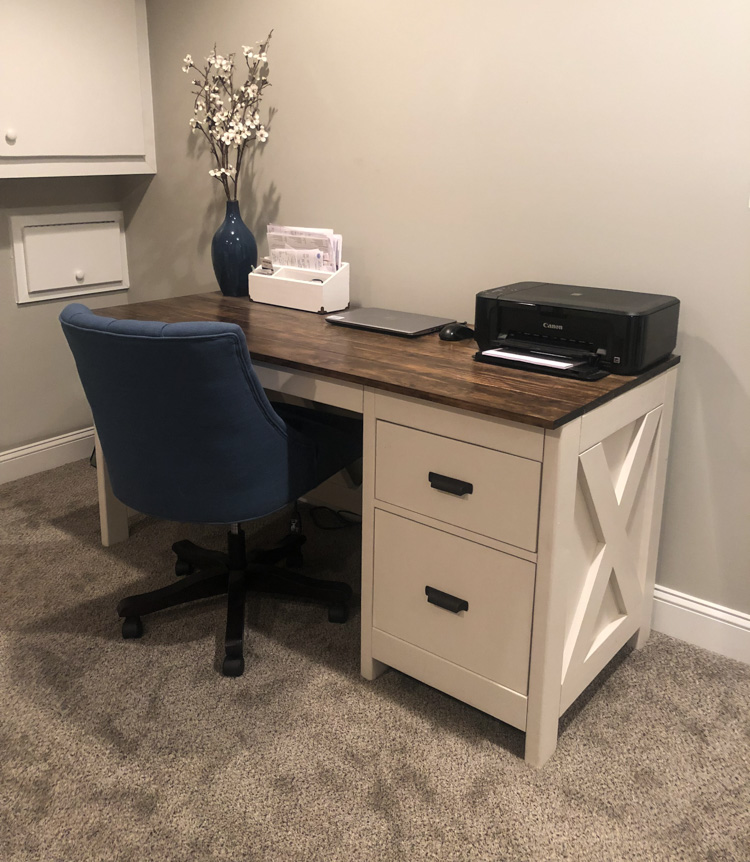
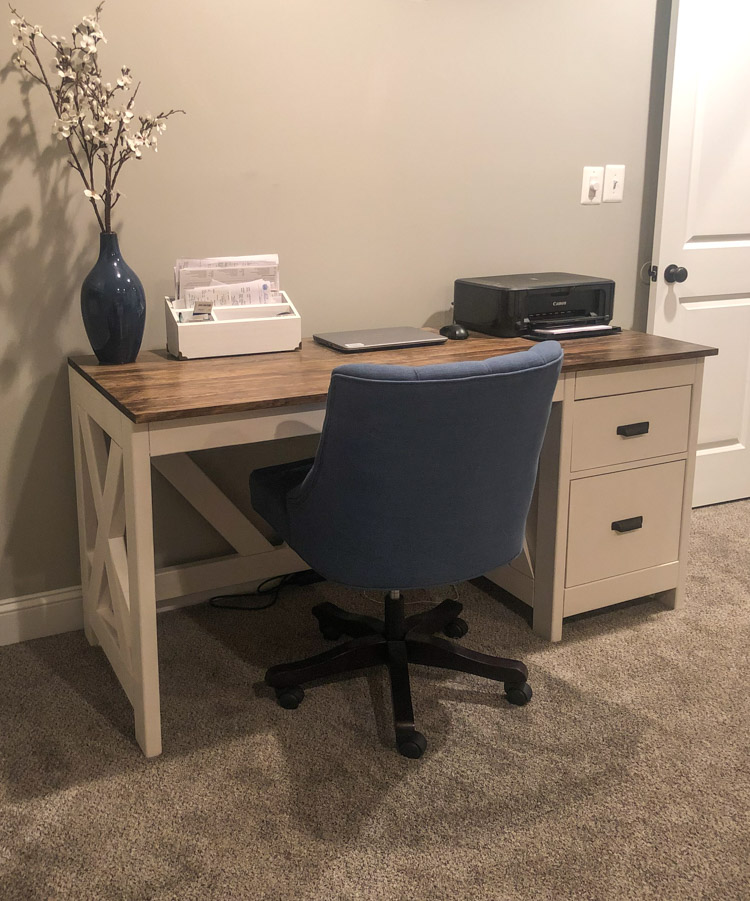
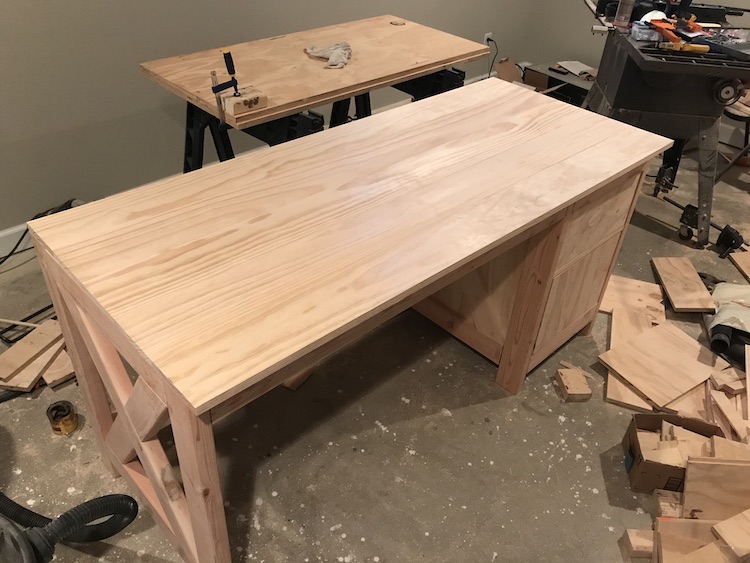
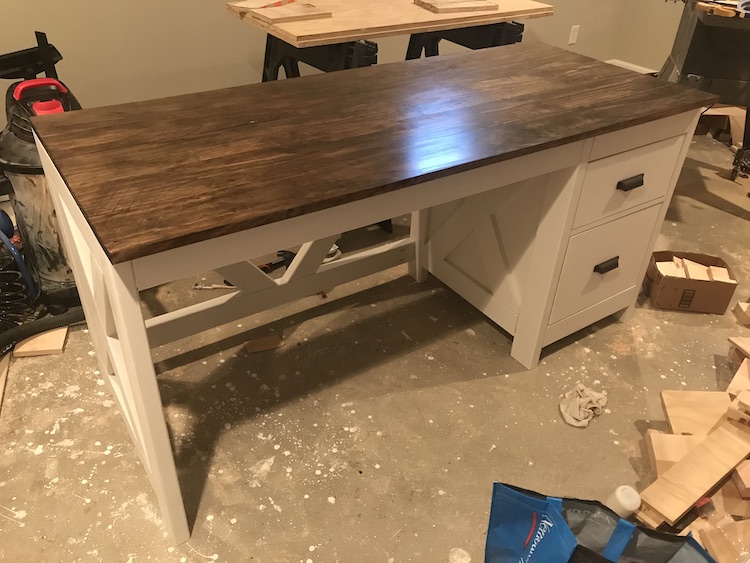
This farmhouse desk is simple to make but a great addition to any house office. You can easily customize it by adding sliding drawers or open shelves.
Almost every piece of furniture I've made to date has had a farmhouse theme. As I've mentioned in the past, our love of Fixer Upper made us realized we really do like that style. If you walked through our house, you would think Joanna Gaines worked on the house herself. But she just inspired us!
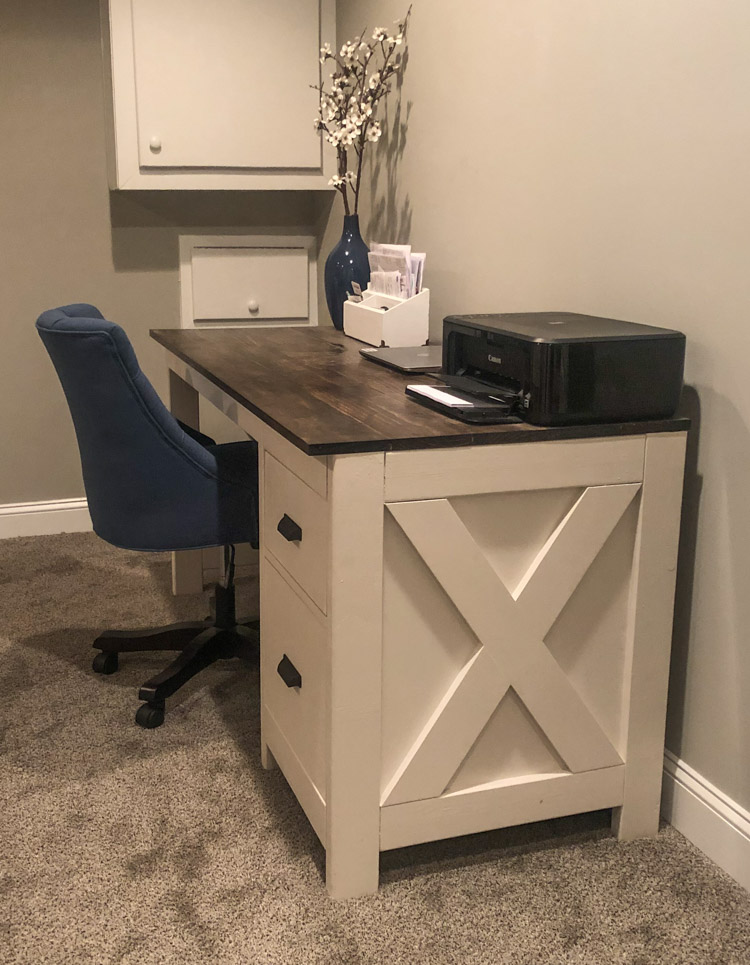
However with this particular farmhouse desk, it wasn't for us. It was actually for a coworker of mine. You may remember I shared an X Side Table back in the day. Well that same person needed a desk for their house office and wondered if I could build it. At that point I had never built a desk so jumped at the opportunity. I sent her a few different desk options and she settled on the farmhouse desk inspired by Handmade Heaven. The one caveat was she wanted drawers instead of open shelving and wanted one of the drawers to be able to house filing folders. So I set to work and loved how it turned out. The dimensions are exactly the same as Handmade Heavens, but the right side of the desk is closed in for the drawers. If you like the open shelving, then I suggest going to Handmade Heaven's example. Either way, you can't go wrong with a version of this DIY farmhouse desk.
Farmhouse Desk Shopping List
- 7 - 2x4s @ 8 ft
- 5 - 1x6s @ 8 ft
- 2 - 1x4s @ 6 ft
- 1 - 1x2 @ 2 ft
- 1 - ¾" plywood (4x8 ft)
- 1 - ¾" plywood (2x4 ft)
- 1 - ½" plywood (2x2 ft)
- 1 - ⅛" plywood (2x2 ft)
- 4 - 22" drawer slides
- 2 drawer handles
- Wood glue
- 2 ½" pocket-hole screws
- 1 ¼" pocket-hole screws
- 1" nails
- Stain or paint
- Polyurethane
Tools
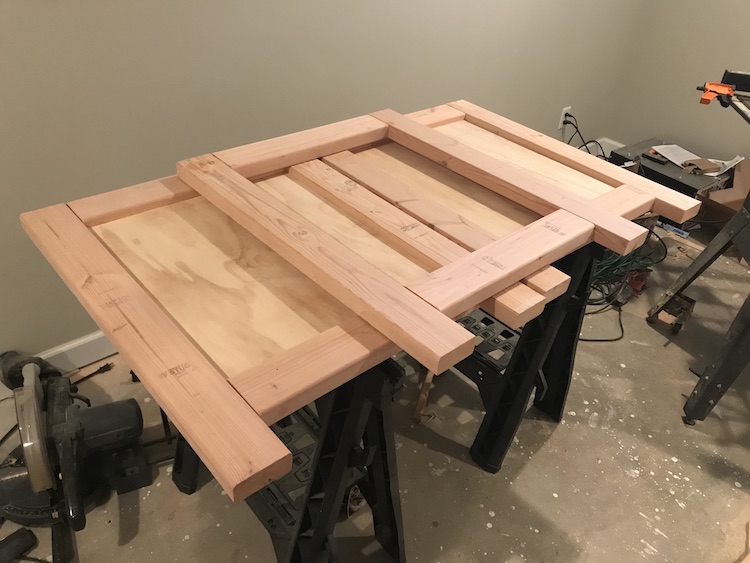
Cut List
- 6 - 31.25" (2x4)
- 6 - 19" (2x4)
- 3 - 43.5" (2x4)
- 4 - 17" (2x4)
- 1 - 17" (1x2)
- 5 - 65" (1x6)
- 3 - 19x21.25" (¾" plywood)
How to Make Farmhouse Desk
Step 1:
Make all cuts listed above.
Step 2:
Attach the 2x4 legs (31.25") to the 2x4 pieces (19") with a Kreg Jig on the 1 ½" setting, using 2 ½" pocket hole screws to with wood glue. Repeat the step for the other two sides of the desk.
Step 3:
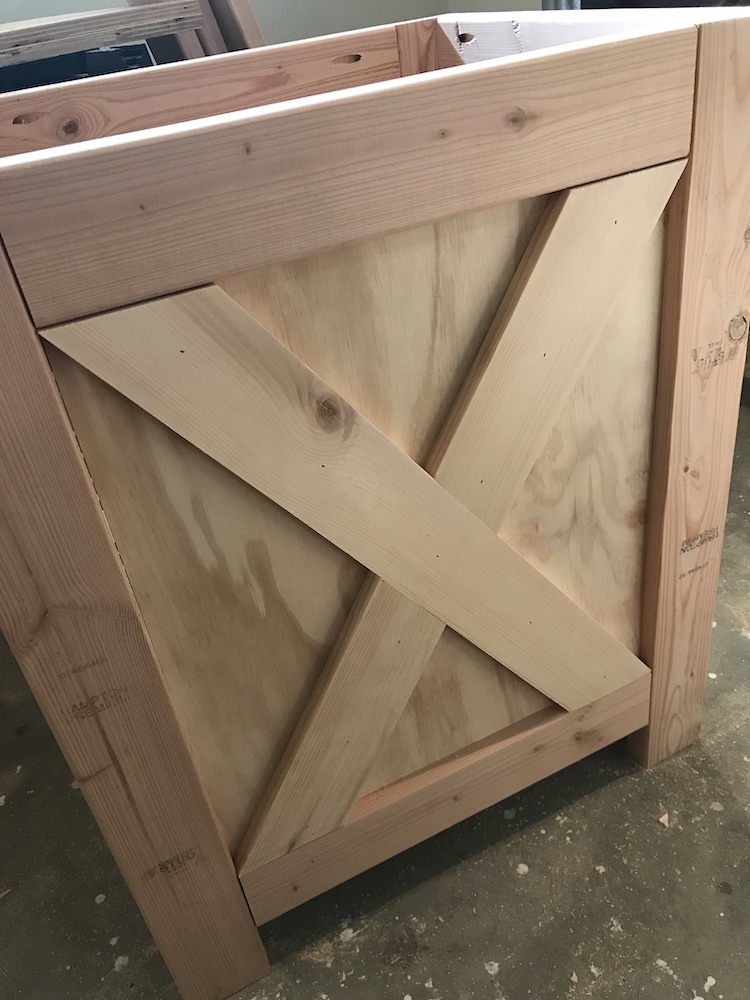
Attach the (2) 19x21.25" plywood to two of the sides with 1 ¼" pocket hole screws and glue. Attach the 1x4 X pieces to the plywood and legs using glue and your nail gun. For best fit, measure the 1x4 to your assembled square. Every single time is different but the degrees are around the same. The longer X piece should be cut around 35 degree, but the degrees could vary. The two smaller X pieces should be cut around 20 degrees on the outside and 20 degrees on the sides attached to the longer X piece, with the degrees varying.
Step 4:
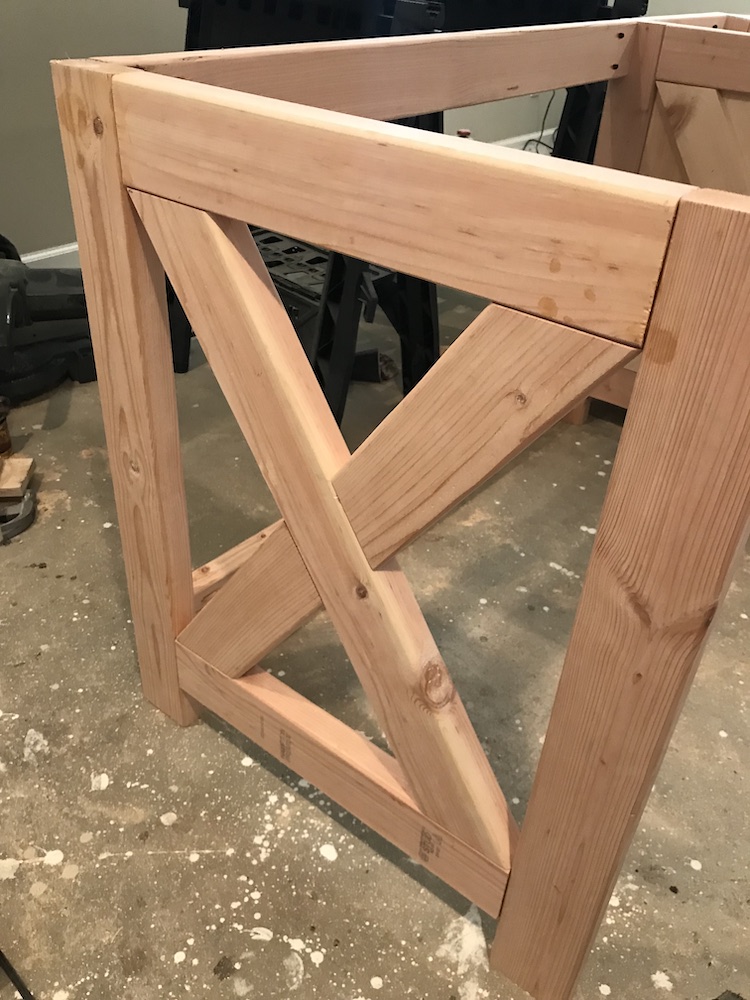
Now you'll be doing the x for the left side of the desk. Attach the 2x4 X pieces with 2 ½" pocket hole screws with wood glue. Measure the 2x4 to your assembled square for a more accurate fit. Again every time is slightly different with the degrees. The longer X piece should be cut at 35 degrees, but could vary by a degree or two. The two smaller X pieces are cut at 20 degrees on the outside and 20 degrees on the sides that are attached to the longer X piece, but again the degrees could vary.
Step 5:
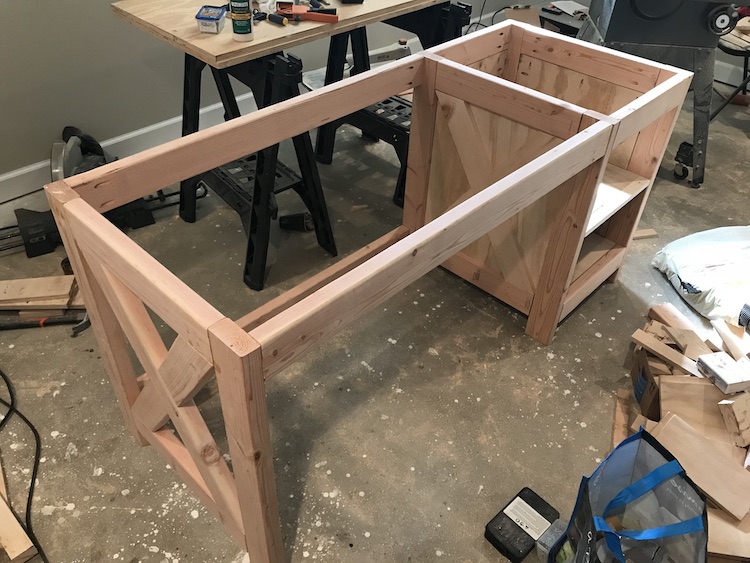
Attach the left leg with the middle leg by attaching the three (43 ½”) 2x4s with 2 ½" pocket hole screws and glue. On the front, you want one piece at the top and on the back you want one piece at the top and the bottom piece should be placed 3” from the bottom of the two legs. Make sure you predrill pocket holes upwards on the top pieces for later so you can attach the top of the desk.
Step 6:
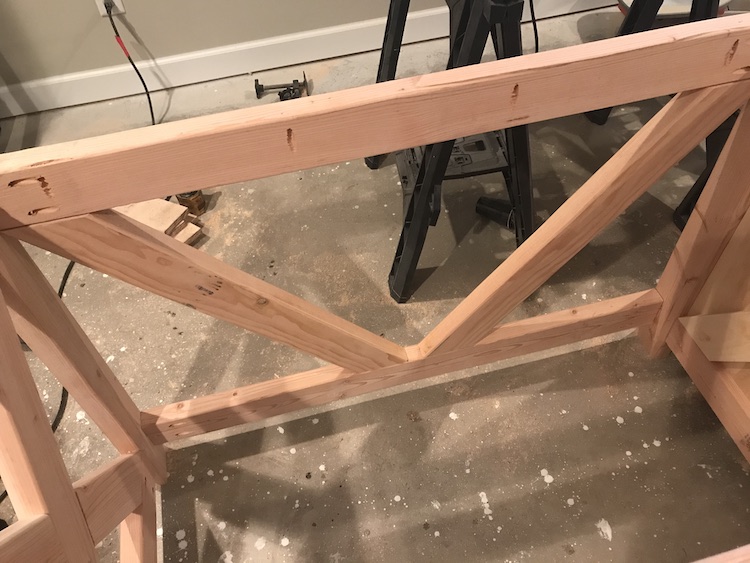
Attach the 2x4 V braces to the back of the desk with 2 ½" pocket hole screws and glue. Measure the wood up against the office desk and mark your cuts as needed so it will fit snuggly. The angles should be 30 degrees, but again is slightly different with every desk.
Step 7:
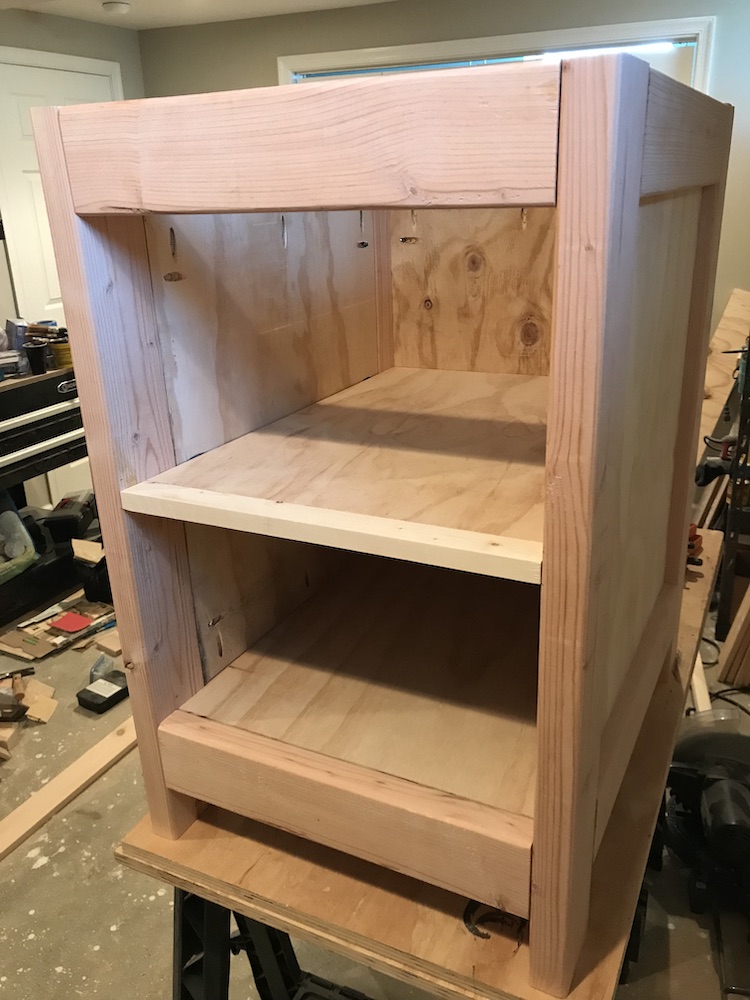
Attach the right assembled leg to the desk by attaching the 2 (17”) 2x4 pieces with 2 ½" pocket hole screws and glue. Now attach the back pieces of wood connecting the legs. Both bottom pieces should be set 3" from the bottom. Attach the back piece of plywood using with 1 ¼" pocket hole screws and glue. Attach the middle (17”) 1x2 piece to the middle of the right hand side of the desk with 2 ½" pocket hole screws and glue. Predrill pocket holes upwards on the pieces for later attachment of the desk top. Note: Ignore the shelves, as I removed them afterward since I decided to do drawers.
Step 8:
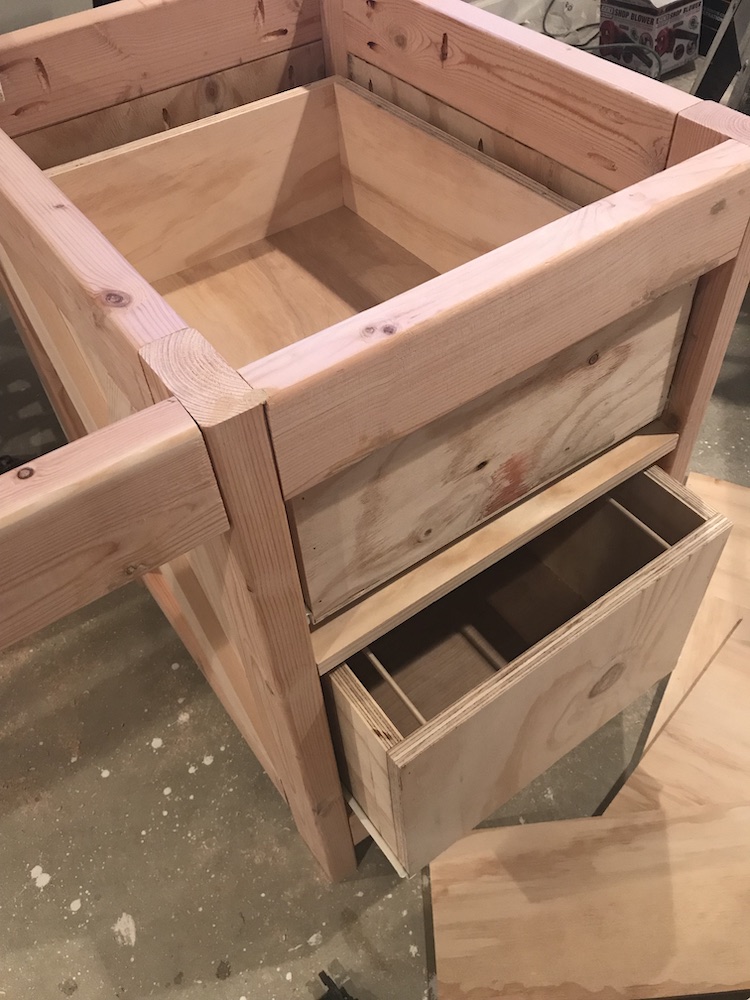
This is the most difficult part. Build the drawers based off the size you want. You have to make sure the width is correct to fit into the drawer slides. I built one smaller than the other because the bottom drawer I made to be big enough for files. I used ¾" plywood for sides, then ⅛" plywood for bottom. I used glues and nails put together. Then I used the ½" plywood to make the face of the drawer that was slightly bigger than the drawer itself.
Step 9:
Attach the drawers to the drawer slides make sure everything fits snugly.
Step 10:
Assemble the table top with 1 ¼" pocket hole screws and glue. Attach the table top to the office desk base using the pre-drilled pocket holes.
Step 11:
Paint or stain how you like.

Alison Brand says
Hi there! If I may ask, I’m just curious how much you ended up charging for this desk? I showed it to a woodworking friend of mine and he gave me an estimate. But I wanted to see how it compared to yours.
Ryan says
Hey Alison,
I ended up charging $200 but it was because it was for a friend of mine. If you factor in labor and everything it should probably be closer to $400-$500.
Dane says
Not sure when you built it but 200$ sell price you definitely lost money. I’m calculating materials now and it’s well over 200$ in materials. You’re a good friend haha
Ryan says
Haha yes it was for a friend. Part of the fun for me was just making it.
Josh H says
I was curious as to what the cut measurements are for the 1x4s and where they go? I noticed it was on the shop list but not on the cut list.
Ryan says
Hi Josh. The 1x4s are the decorative X that goes on the outside of where the drawers go. I purposely didn't include the measurements as you want to measure the X pieces to the assembled desk sides you just made. Step 3 goes into a little more detail here. Let me know if you have any other questions!
Crystal says
What are the final dimensions for the top of the desk?
Ryan says
65 inches by 27.5 inches. It is five 1x6s glued together at 65 inches in length.
Adrian says
How did you make the file holders in the bottom drawer
Ryan says
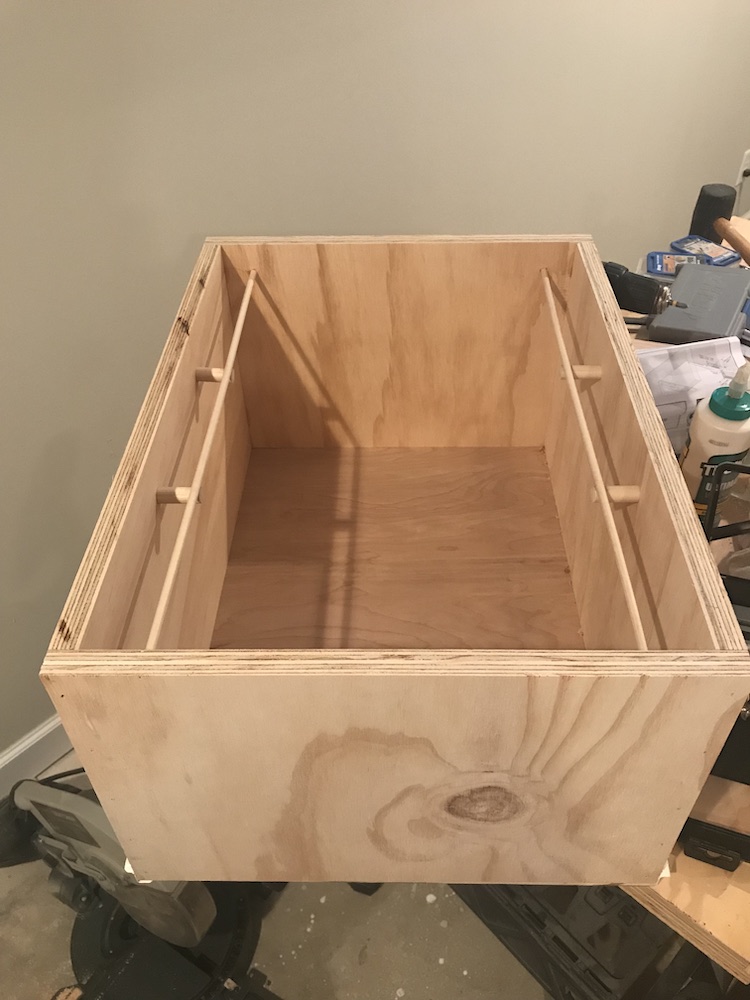
I cut some 1/4 inch dowel rods to fit to the depth of the drawer and then cut 1/2 inch dowel rods to fit to the side and to act as support for the file holders. I measured the 1/4" dowel rods to make sure they were the same width apart as an actual file folder.
Nathan says
What are your drawer sizes?
Craig says
Hey trying to figure out where the 2x4 for the one X brace comes from. The 31 1/4 pieces should be the sides and then connected with the 6 -19” pieces so that uses all of those. The 4-17” pieces go to make the cabinet and the 3-431/2 pieces run along the back and top to make the length of the desk. That uses all 6 pieces of 2x4??? How do i get the cross brace and the X out of it ?
Ryan says
My apologies Craig. I had updated this recently and it must have switched back to the old post which didn't have the correct number of 2x4s. You need 7 2x4s. You can see detailed instructions at Homemade Heaven which this desk was based off. Hope the build is going well!
Justin Lichty says
Can you please tell me the dimensions to cut the plywood for the drawers. And then what are the dimensions of the drawer faces. Thanks for the help. I can't wait to build mine this weekend!
Ryan says
I purposely don't include dimensions as it depends on the space it is going in which is slightly different every time. Here is some guidelines on what size your drawers should be based off the opening.
Maira says
Do you happen to have a picture of the back of the desk?
Ryan says
I unfortunately do not.
Diane says
Do you have these desk ready to sell ?
I would like the farmhouse white/wood with drawers too. How much if they are ready to buy?
Ryan says
Hi Diane,
I do not sell these. However I've seen similar style desks on Etsy.
Kristin says
What kind of woods for each items on shopping list? From what store?
Ryan says
Everything I used for this was pine wood. I got it from Lowe's but you can get it from a variety of stores.
John says
It’s a beautiful desk. I am making one for my son, but it will be “L” shaped. I too will be putting drawers in which to me is the hardest part. I will be using a combination of 1x6 and 1x4 for the table top. My son doesn’t wanted it painted, so will just put a light stain or just poly it.
Ryan says
Awesome! Good luck!
Tikka says
Very nicely done. I especially like the colors you've selected. Is that a dark walnut stain for the desktop? Any particular brand/color for the white?
Ryan says
Yes dark walnut on top. I just used a regular white paint for the desk from Lowe's. I can't remember the brand unfortunately.
Erin says
In total, how much did building this desk cost you?
Ryan says
With the drawers, it was about $150. However if you take that away it was about $100. Really depends on the type of wood you use. If you use pine, it isn't too bad.
Steve Brent says
You say in step 1, "Attach the 2×4 legs (31.25″) to the 2×4 pieces (19″) ***with a Kreg Jig on the 1 1/2″ setting***, using 2 1/2″ pocket hole screws to with wood glue." I don't know that I've seen instructions to use a 1 1/2" setting with 2 1/2" screws. Am I reading that correctly?
Steve Brent says
Ok, it's really step two...
Ryan says
Yes that's the setting I used with my Kreg Jig. I use a mini Kreg Jig so the setting might be different for another one.
Steve Brent says
Ryan - I apologize for the last post. It is illogical. Of course you use the 1 1/2" setting because that's the width of a 2x4. I wasn't thinking straight when I asked the question. Could you please delete the post(s) and your reply? thanks
James says
What size pocket hole screws do you use to attach the 1x6 table top to the 43.5inch 2x4 frames? Also what depth setting did you use on your Kreg jig to pre drill the pocket holes for this step. Also what depth setting did you use when you screwed together each of the 1x6 pieces for the table top.
Ryan says
The top is 3/4" thick so that's the depth setting you use and use you use 1 1/4" screws, both to attach to top and screw the pieces together.
Chasity says
Hi, I dont see the 2 1x4 on the cut list.
Ryan says
I don't include them in the cut list as it is dependent on the square. Every one is slight different. It is mentioned in step 3. Let me know if you have any other questions!
Attach the 1x4 X pieces to the plywood and legs using glue and your nail gun. For best fit, measure the 1x4 to your assembled square. Every single time is different but the degrees are around the same. The longer X piece should be cut around 35 degree, but the degrees could vary. The two smaller X pieces should be cut around 20 degrees on the outside and 20 degrees on the sides attached to the longer X piece, with the degrees varying.
Kendra says
I am trying to attach the table top pieces together. Did you use the kreg jig to pre-drill holes on the long edges and then attached them that way together? I understand how to attach the tabletop to the desk structure but I'm just confused how to attach the table top pieces together. Any help or advice would be greatly appreciated.
Ryan says
Yes I used a kreg jig and glued together with 1 1/4" pocket hole screws.
Chris says
I know that every project piece will be a little different, but please indulge me...can you provide more detail in the cabinet drawers. What were the actual dimensions of your drawers. Asking as I have had horrible experiences with building drawers but this addition is required.
Ryan says
Agreed it definitely can be a pain. One was 8 inch in height and the other was 12 inch in height. They were both 15 1/2 inches wide to account for the drawer slides and 22 inches in depth. This video is helpful in calculating the drawer size.
Jason says
I'm not seeing the dimensions for the back of the column. If I'm to attach the 17" 2x4 at the top & bottom, front & back, it should be 17"x 21.25", I just wanted to confirm my math.
Ryan says
I'm not sure what you mean by back of the column. My desk was based off this design which has great step-by-step photos if that helps.
Michael says
"3 - 19x21.25" (¾" plywood)"
Did you mean to put 19x31.25? Because I already cut the plywood to 19x21.25 and I didn't catch the error until after and they are not big enough. Guess I need to get more plywood now.
Ryan says
No. It is 19x21.25". It is 19 inch wide and 21.25" tall. You don't want it to be the entire height of the legs. The legs are 31.25" tall.
Danny R says
Hey Ryan,
Just curious, what would you change about this design if you want to make the desk easier to breakdown into parts for easy transport ? I live in rental apartment and wondering how to transport the desk and my only option would be to break it down.
Ryan says
Unfortunately I'm not sure of a way to do that. You could cut all the pieces and just put the sides together but you risk not being able to make adjustments if the length of a piece is just off.
Robert Sweet says
Hi Ryan,
You mentioned in a previous reply that you used all pine.....is this for the 2x4 's as well?
Ryan says
Yes.
Joe says
I feel like this is a stupid question. I just realized the lumber and cut list was without the drawers. Is the 4x8 plywood enough for the desk sides and the top? The lumber cost wasn’t cheap so I just want to be sure before I cut!
Ryan says
You might be able to get enough out of it but probably will need to buy a little more. And yes wood was much cheaper when I made this a few years ago.
Christopher says
I just finished making my version of this desk. Thank you for the base plan. I love the way it turned out. About how long did it take others to build this. I ask because it took me probably about 17 hrs of actually working on it which seems like a lot.
Ryan says
While others have made it, no one has specifically told me how long it took. It's been a few years now since I made it, but when factoring in paint, stain, etc... I believe it was a good 16 hours for me.
Christopher says
Thank you for your fast comment. I was just curious if my time was similar to others. I made it for myself not to sell so the time wasn't to strict. Thank you again for the plan. I finished it today. I did a white wash on the bottom and stain and poly on top.