This post may contain affiliate links. Please read my disclosure.
Inspired from Ana White's plans, this homemade Adirondack chair only uses a miter saw and jig saw to put together and are perfect for your backyard.
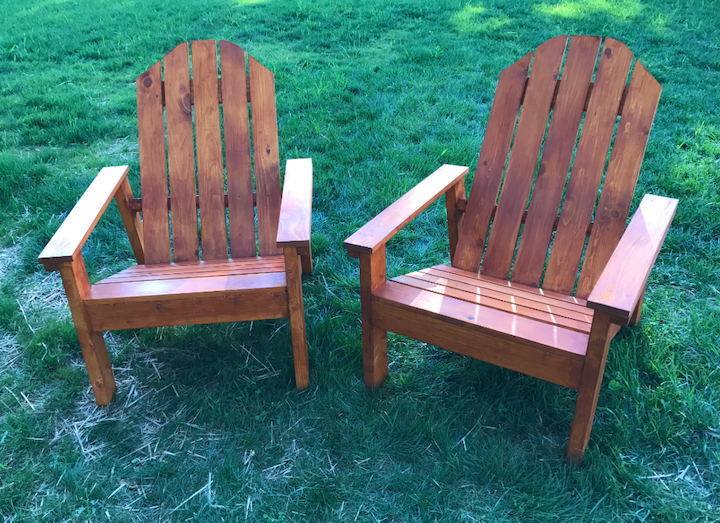
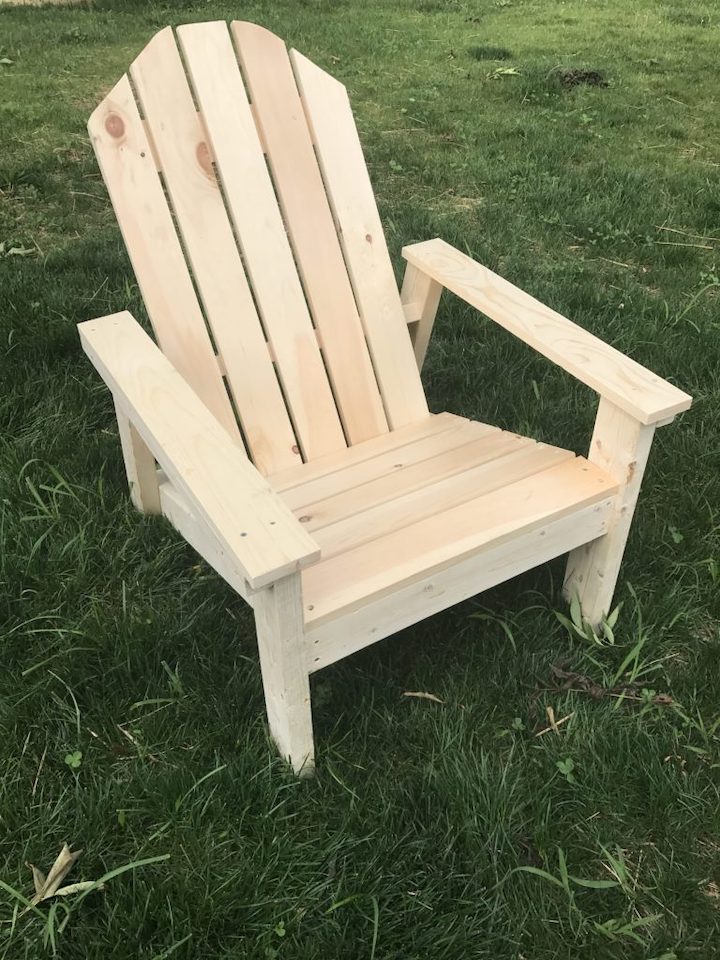
So about a year ago I started making a to-do list of woodworking projects I wanted to make in due time. One of the big ones was an Adirondack chair. For some reason I felt like it was a right of passage to make one. And I'm glad to say I passed with flying colors with these DIY Adirondack chairs!
Just last week we had our fence put in, which means our dog Zooey has a huge yard to run around in! It also means we have more of a reason to sit around in the backyard. It also just so happened to be the first weekend in over a month that Lauren and I didn't have something going on. So on a whim on Saturday morning, I asked Lauren if she'd be up to make some chairs, thinking she wouldn't be, but I was wrong! It actually was my first project that Lauren helped with and we had a lot of fun making it. Per usual the first place I checked for Adirondack chair plans was Ana White's site and she didn't disappoint. They can be found here and the images are below in the directions.
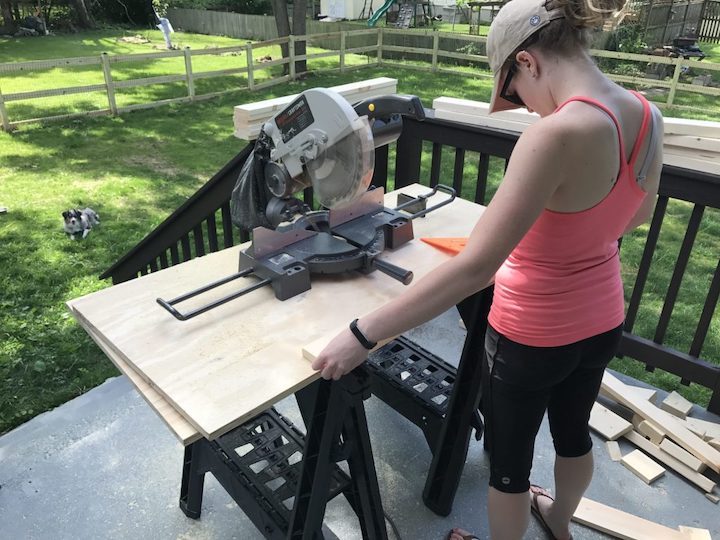
One of the best things about making these wood Adirondack chairs is you actually don't need many tools, which at the moment I don't have. Most of my big projects I've had to make with Lauren's dad as he has way more tools but the main two things you need here are a miter saw and jigsaw. As it was a last second idea, I just went to Lowe's and got some pine wood which isn't perfect for outdoor projects. I'd suggest using cedar, but the local store that provides that in my area isn't open on the weekend.
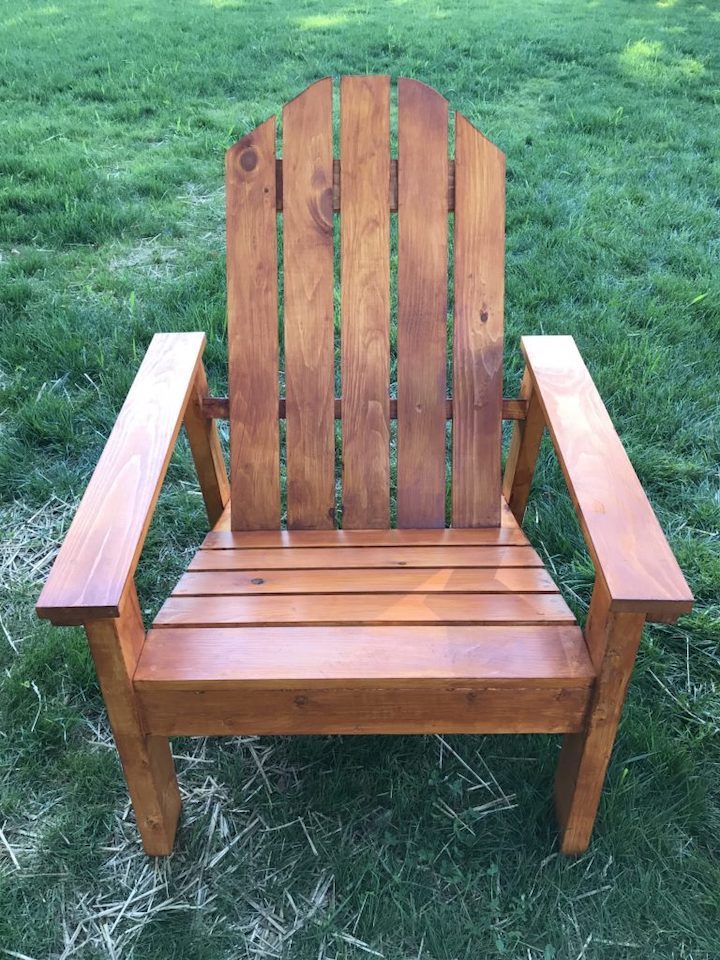
In the end, we made a couple of mistakes here in there but it was a lot of fun working together. As I mentioned, it was the first time Lauren had helped me and she quite enjoyed herself. There is just something so satisfying about making something with your hands and seeing the end result. We made two homemade Adirondack chairs so it does take some time to put together. When you count sanding, cutting, gluing, nailing and staining, it was about 10 hours worth of time over the weekend but well worth it. And if you've never sat in one, these chairs are quite comfortable. Soon we'll make two more to sit around the fire pit we just made! So use these Adirondack chair plans and go out and make some yourself.

Homemade Adirondack Chair Plans Shopping List
- (3) 2" x 4" @ 8'
- (1) 2" x 2" @ 6'
- (4) 1" x 4" @ 8'
- 2 ½", 2" and 1 ¼" exterior screws
- Titebond III wood glue
- 80, 150, 220 grit sandpaper
- Exterior stain or paint
Tools
Cut List for Wood Adirondack Chairs
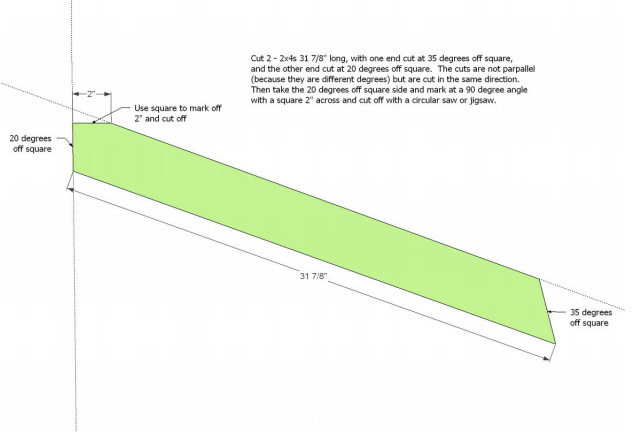
- (2) 2" x 4" @ 31 ⅞", one end cut at 35 degrees of square to longest point, other end cut at 20 degrees off square to shortest point (stringers)
- (2) 2" x 4" @ 20 ¾" with both sides cut parallel at 15 degrees off square (back legs)
- (2) 2" x 4" @ 20" (front legs)
- (2) 2" x 2" @ 26 ½", longest point measurement, one end cut at 15 degrees of square (arm support)
- (2) 2" x 4" @ 22 ½" (front apron and back support)
- (5) 1" x 4" @ 22 ½" (seat slats)
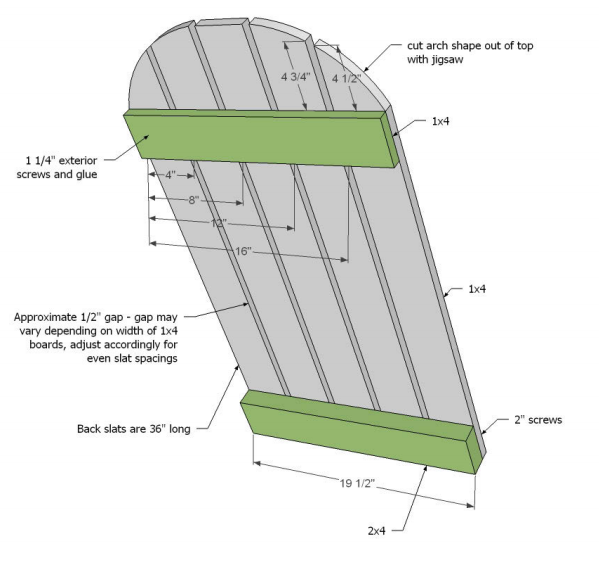
- (5) 1" x 4" @ 36" (back slats)
- (1) 1" x 4" @ 19 ½" (back top support)
- (1) 2" x 4" @ 19 ½" (back base support)
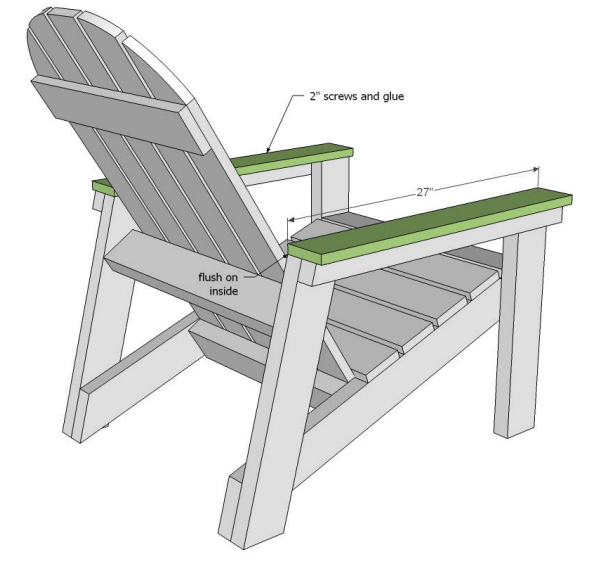
- (2) 1" x 4" @ 27" (arm rests)
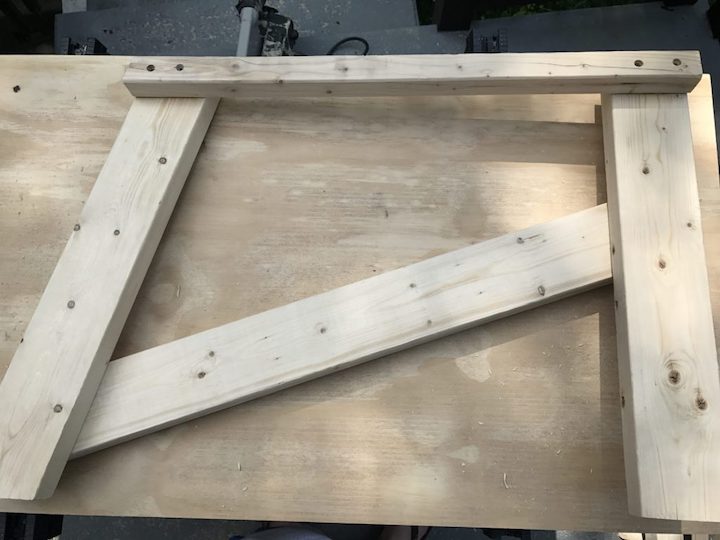
Step 1:
Cut all boards to length as written above.

Step 2:
Sand all boards at 80, 150 and 220 to make sure it is as smooth as possible.
Step 3:
From stretcher board, cut off top portion by marking with a square and cutting off with a jigsaw to get the angle. Do this with stretcher boards.
Step 4:
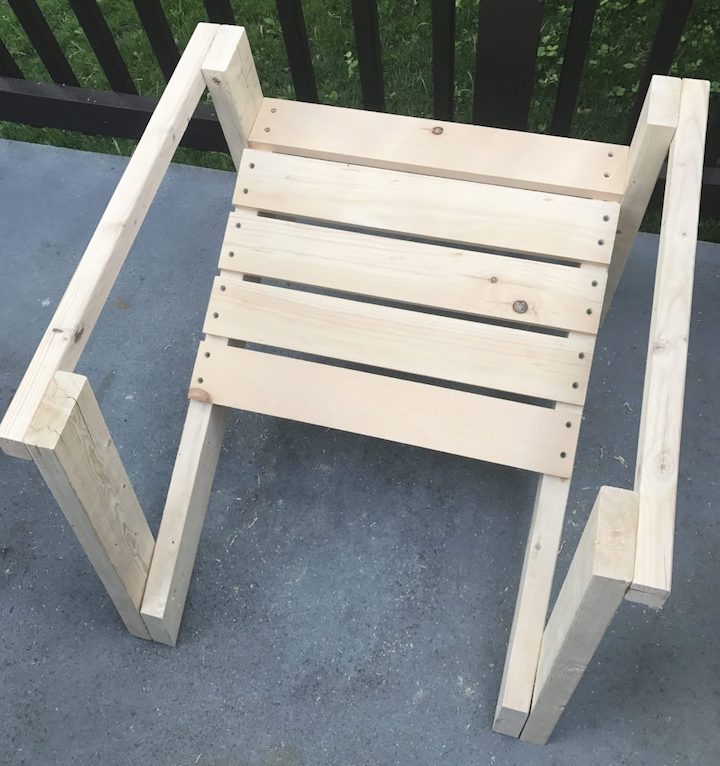
Attach one back leg and one front leg to an arm support with 2 ½” exterior screws. Keep the top and outside edges flush.
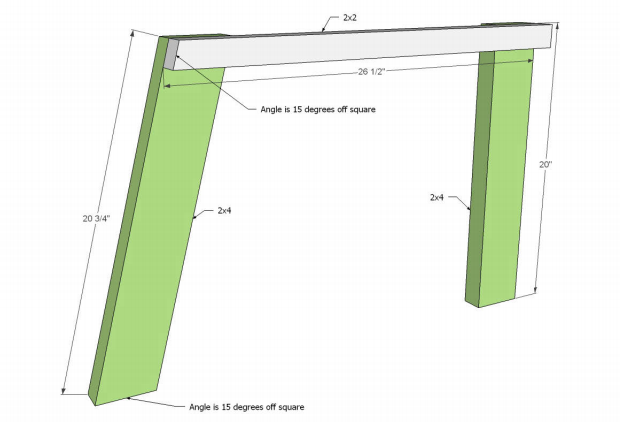
Step 5:
Mark front leg on inside with arm support on outside, as shown in diagram. Leave 1 ½” space in front of stretcher. Attach stretcher to front and back legs with 2 ½” exterior screws and glue. (This might not be perfect as far as ½ from front as I learned. Most important thing is that both are the same height)

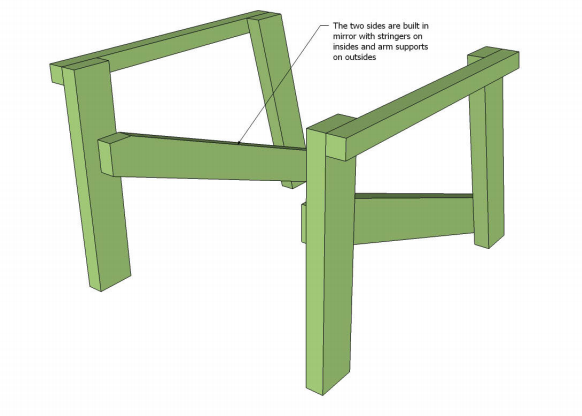
Step 6:
Build opposite side of chair in mirror, with arm supports to outside and stretcher to inside. Make sure the two match up. (Again make sure both of these are the same height from bottom as this is what slats sit on)
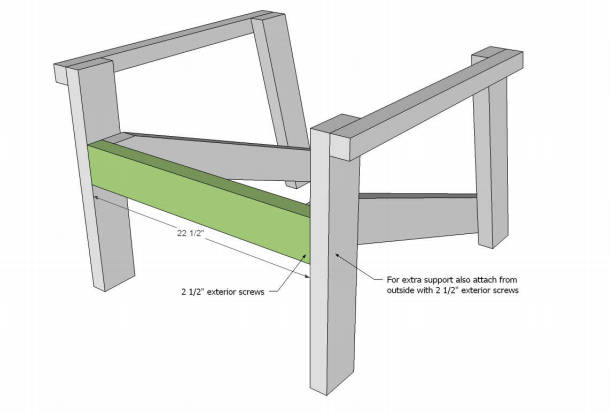
Step 7:
Front Apron is attached to fronts of stretcher and from outside of chair for additional support.
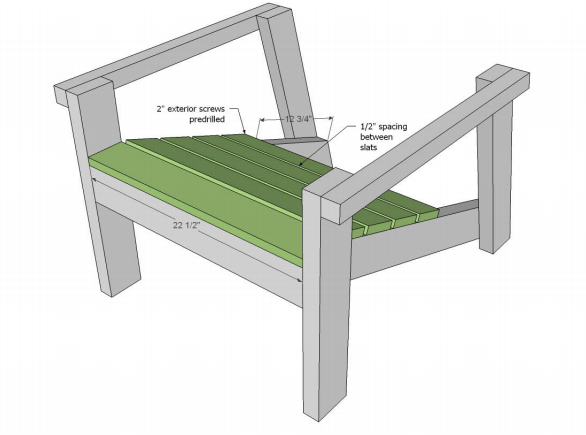
Step 8:
Begin at the front of the chair and attach seat slats to stretcher with 2” screws and glue. Leave a ½” gap between seat slats. Make sure the back stays 22 ½" wide and doesn't get wider. I made this mistake and had to cut a longer piece of wood.
Step 9:
Build back by attaching all back boards to seat back base support, leaving approximately ½” gap in between. Then attach at top with 1 ¼” screws. Cut arch shape on back top using a large round object to guide you. I used a bucket.
Step 10:
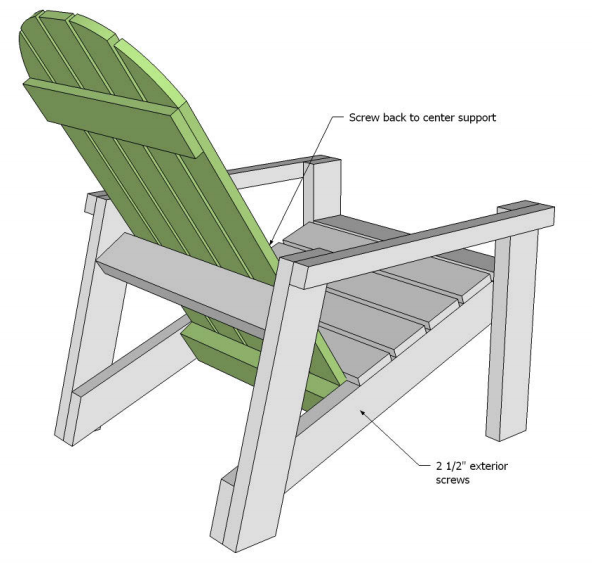
Place back inside chair and secure in place with 2 ½” exterior screws. Also screw back to back support with 2” exterior screws.
Step 11:
Attach back support to back legs with 2 ½” exterior screws, matching up measurements in diagrams. This is the piece I had to cut longer as I didn't make sure that the width was staying the same. You live and learn! (NOTE - I didn't put back support in before back inside chair. I did after to make sure it was at the proper angle with backside.)

Step 12:
Secure armrests to arm supports and tops with screws and glue.
Step 13:
Fill in the holes from the screws with wood filler and sand down once dry.
Step 14:
Stain or paint the chair that is meant for outdoors so that it will last. Then enjoy your homemade Adirondack chairs.

Sylvia says
I love the rustic look of your knotty pine Adirondack chairs. Great teamwork!
James DiFazio says
Hi,
you did a good job with the adirondack chair, I have the plan but am stumbling with the two 31 7/8 board. I cant seem to figure out the angle. It says to make a 2 inch cut. Is that off of 20 degrees? or is that a 90 degree cut. Hope I'm making sense!!!
Thanks Jim D
Ryan says
Thanks. After you cut the 20* angle, you then cut 2 inches off at a 90° angle. This is done to support the front seat slat on top. Let me know if that answers your question. It can be confusing! The diagram above is helpful.
Shawn Wiggiins says
Will the board still be 31 7/8 as it’s not making since to me!!
Ryan says
Yes. See the image below step 3 on how it looks. It's from one corner to the other. That is the length after cutting the angles needed.
Brittney says
If I cut the board to 31 7/8 and then cut off a 20 degree angle the same direction of the 30 degree angle then it take length off the board and measuring as depicted in the diagram makes the board shorter. Should I have cut the board longer to accommodate the loss from making the 20 degree cut?
Ryan says
No it is that length once it is caught off at the angle.
Candace says
What color and brand of stain did you use?
Ryan says
Valspar Canyon Brown exterior stain at Lowe's.
Brittney says
The chairs came out really great but the board list is off. There should be one 19.5 1x4 and one 19.5in 2x4. Ended up being short on 1x4 boards, but the design graphic shows it’s a 2x4.
Ryan says
Thanks for letting me know. I'll update!
Debbie says
I'm picking up my supplies for this today. Is there an updated cut list I should have per the comment from yesterday, 4/27/20 about the 1x4 and 2x4 lengths?
Ryan says
Yes I updated. It was just a typo on one of the cuts. It doesn't change the amount of wood you need!
Carolyn says
We made one of these using Ana’s pattern. It’s great, but I’d personally like something that doesn’t lean back so far. How could I tweak this so I could sit up a little straighter?
Ryan says
Hmmm good question. I feel like that would involve a few changes, including making the stretcher boards longer and at less of an angle. You would then have to make arm supports longer to match and then you could have the back support at a little less of an angle.
Kim says
Is the wood list enough to make one or two chairs? Thanks!
Ryan says
No it is for 1 chair.
Donald says
I really want to build 2 of these for my patio. I live in an upstairs apartment. The problem is they sit so low that I won't be able to see over the 3 foot wall that goes along the bottom half of my balcony. Any suggestions for making this chair sit a little higher up?
Ryan says
From a plan perspective I don't unfortunately. My only thought is you could just make the legs longer and have the back not as angled so it would look something like this.
Donald says
why would the angle need to be changed?
Jess says
If i cut the 2 back and front legs at certain angles or what not and add a curved board, can they become rocking chairs? trying to use same template you have but convert into rocking chair...is that possible? If so, i would love to know your thoughts on how i can make that happen. Thanks
Ryan says
In theory yes that should work, however I haven't made any like that so can't 100% say it will. When I look at examples online it looks like that is all you need to do. Sorry I can't be more help.
peter says
are the dimensions for the back slats correct, surly the boards need to be 3 1/2" X 1" as 5x 4 is 20 plus a 1/2" gap which makes it 22 1/2" b whilst the drawing gives a size of 19 1/2"
Ryan says
Yes it is correct. Five 3 1/2" wide boards is 17 1/2" so plus the 2" total for the gaps makes it 19 1/2". Let me know if you have any other questions!
Donna says
How far down from the top do I screw in the top back support?
Dana Miller says
I appreciate the plans and will build a pair this spring. I will be using red cedar that my father had milled from trees he cut down in his yard. One thing I suggest is using a spar varnish, like Rust-oleum Spar Varnish. This will protect the finish from UV, heat, cold, and rain. It's used on boats to protect wood finishes there.
Amanda says
My son just made one in shop class at school. And I’m having a hard time knowing which stains to use for a weatherproof finish.
Thank you
Ryan says
I would do a weatherproof stain and sealer.