This post may contain affiliate links. Please read my disclosure.
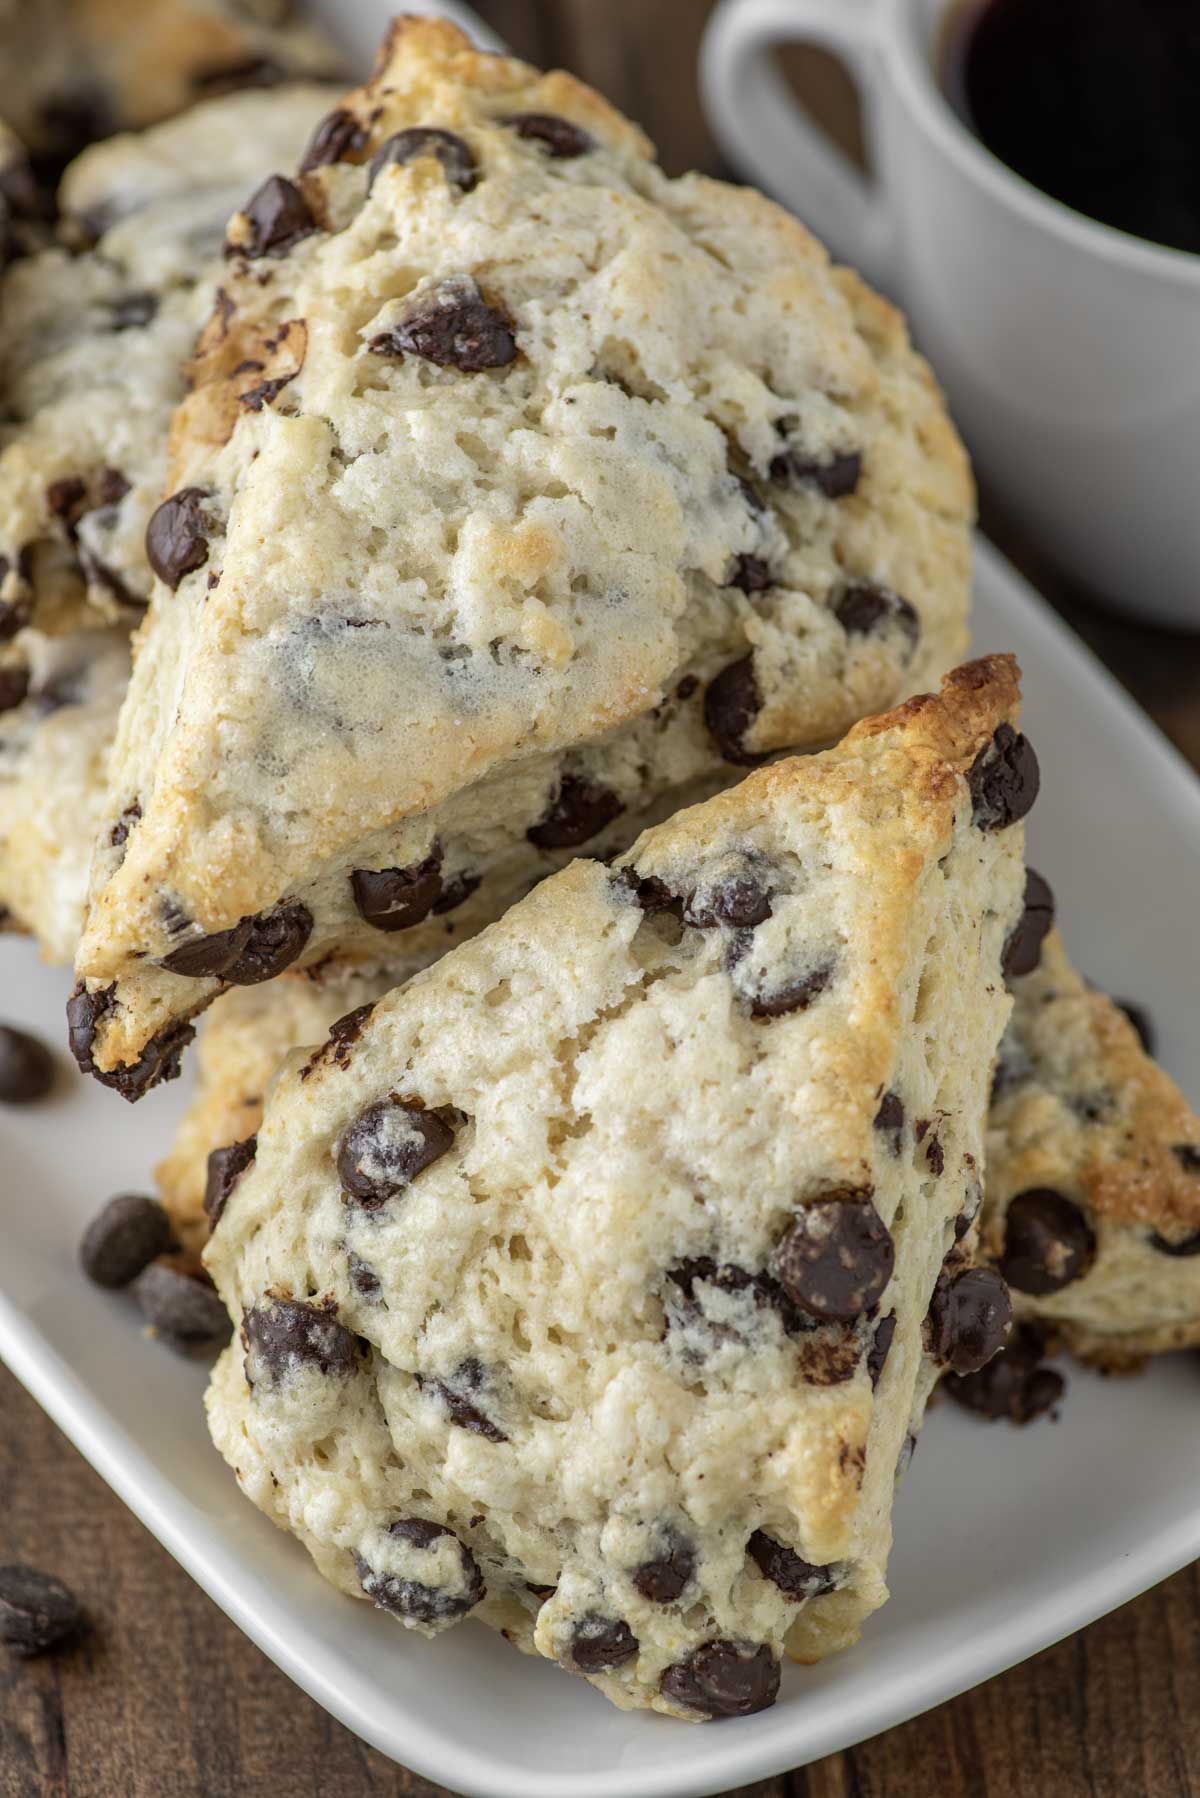
These easy chocolate chip scones are the British version of a biscuit, making them slightly sweet and buttery with a crumbly edge. If you are craving chocolate chip cookies for breakfast, these scones are for you.
Scones are basically biscuits, with a little bit of sugar. If you compare them to my flaky buttermilk biscuits, you'll see the similarities.
If you've never made homemade scones, you'd be surprised just how easy they are to make. You simply whisk together some dry ingredients before mixing in some buttermilk and the shaping into a disc. Just cut to size and then bake. It really isn't too complicated.
Sometimes the simplest recipes are the best however and this scone recipe is no different. The flaky layers just melt in your mouth and chocolate of course makes everything better.
So if you want to whip up something quick and easy for breakfast to go with a nice cup of coffee, consider trying these easy chocolate chip scones.
Jump to:
Recipe Ingredients
- All-purpose flour - can also use whole wheat flour.
- Granulated sugar - adds sweetness. Can also use raw cane sugar.
- Baking powder/soda - helps the homemade scones rise.
- Salt - enhances the flavor.
- Unsalted butter - creates the flaky crust you expect.
- Dark chocolate chips - any type of chocolate chip will do but I like dark chocolate for these.
- Buttermilk - the acidity reacts with the leaveners and creates a nice rise.
- Vanilla extract - enhances the flavor of the chocolate chip scones.
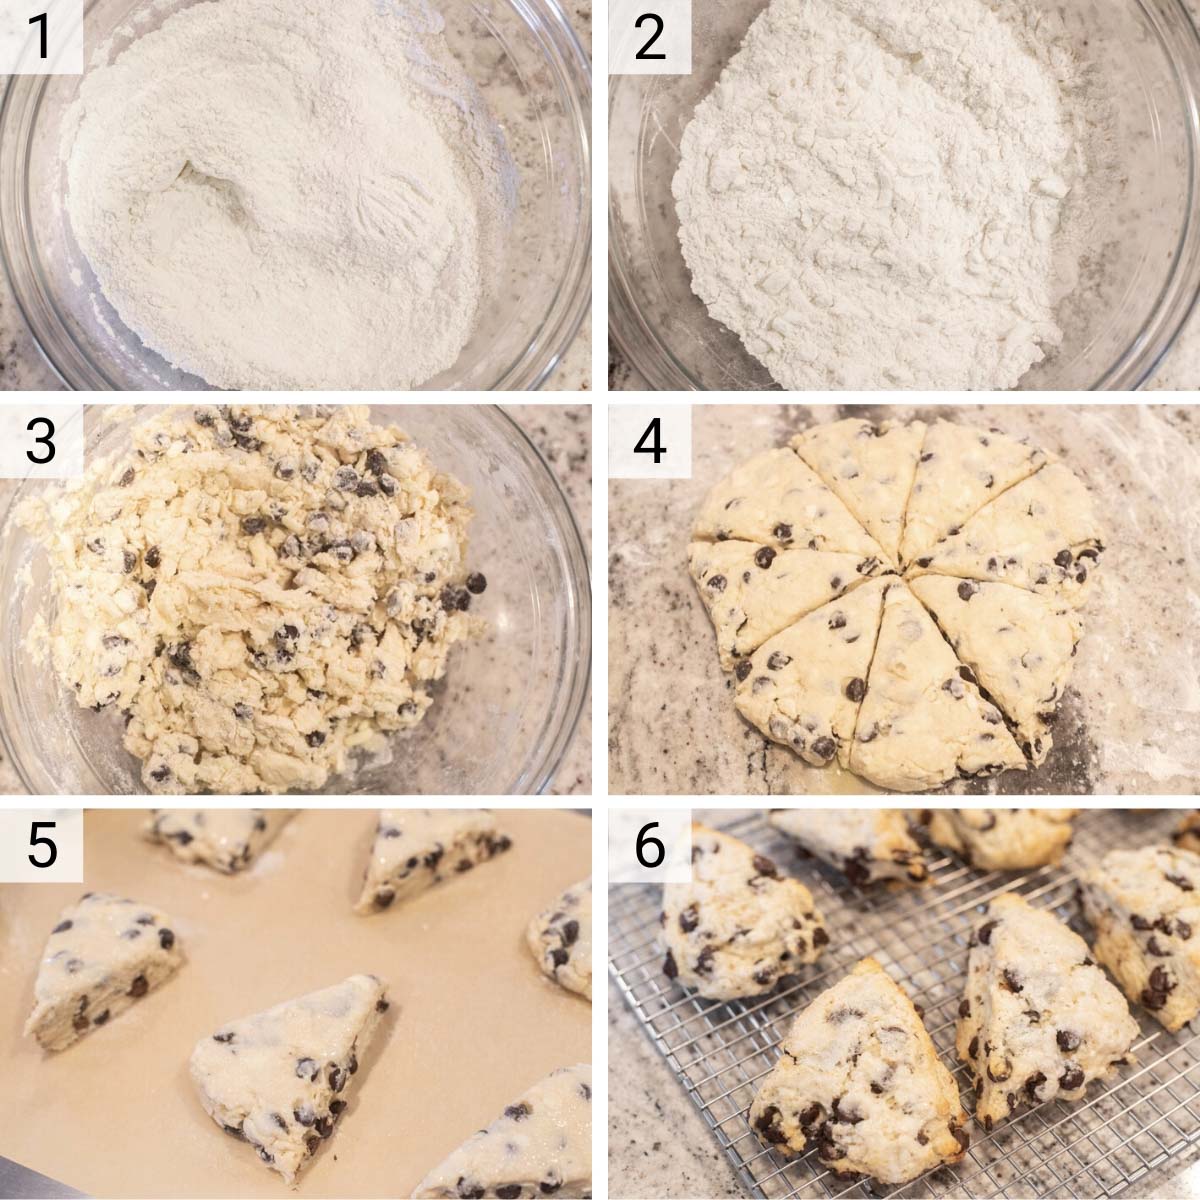
Step-by-Step Instructions
- Preheat oven to 400°F. In a large bowl, whisk together the dry ingredients.
- Grate the cold butter using a cheese grater. With a knife, blend the butter in with the flour. The mixture should look crumbly. Mix in the chocolate chips at this point.
- Whisk together the buttermilk and vanilla in a cup and then add to the flour mixture and mix until JUST incorporated. It is important to not over mix or you will have dense scones.
- With a little flour on a clean surface, knead the dough for about a minute. Shape into a circle that is about 1 ½ inches thick. Cut the circle in half and then each half into 4-5 wedges. It just depends on how large you like your homemade scones.
- Put the scone wedges on a baking sheet lined with parchment paper. Brush the tops of each with buttermilk and then lightly sprinkle with sugar.
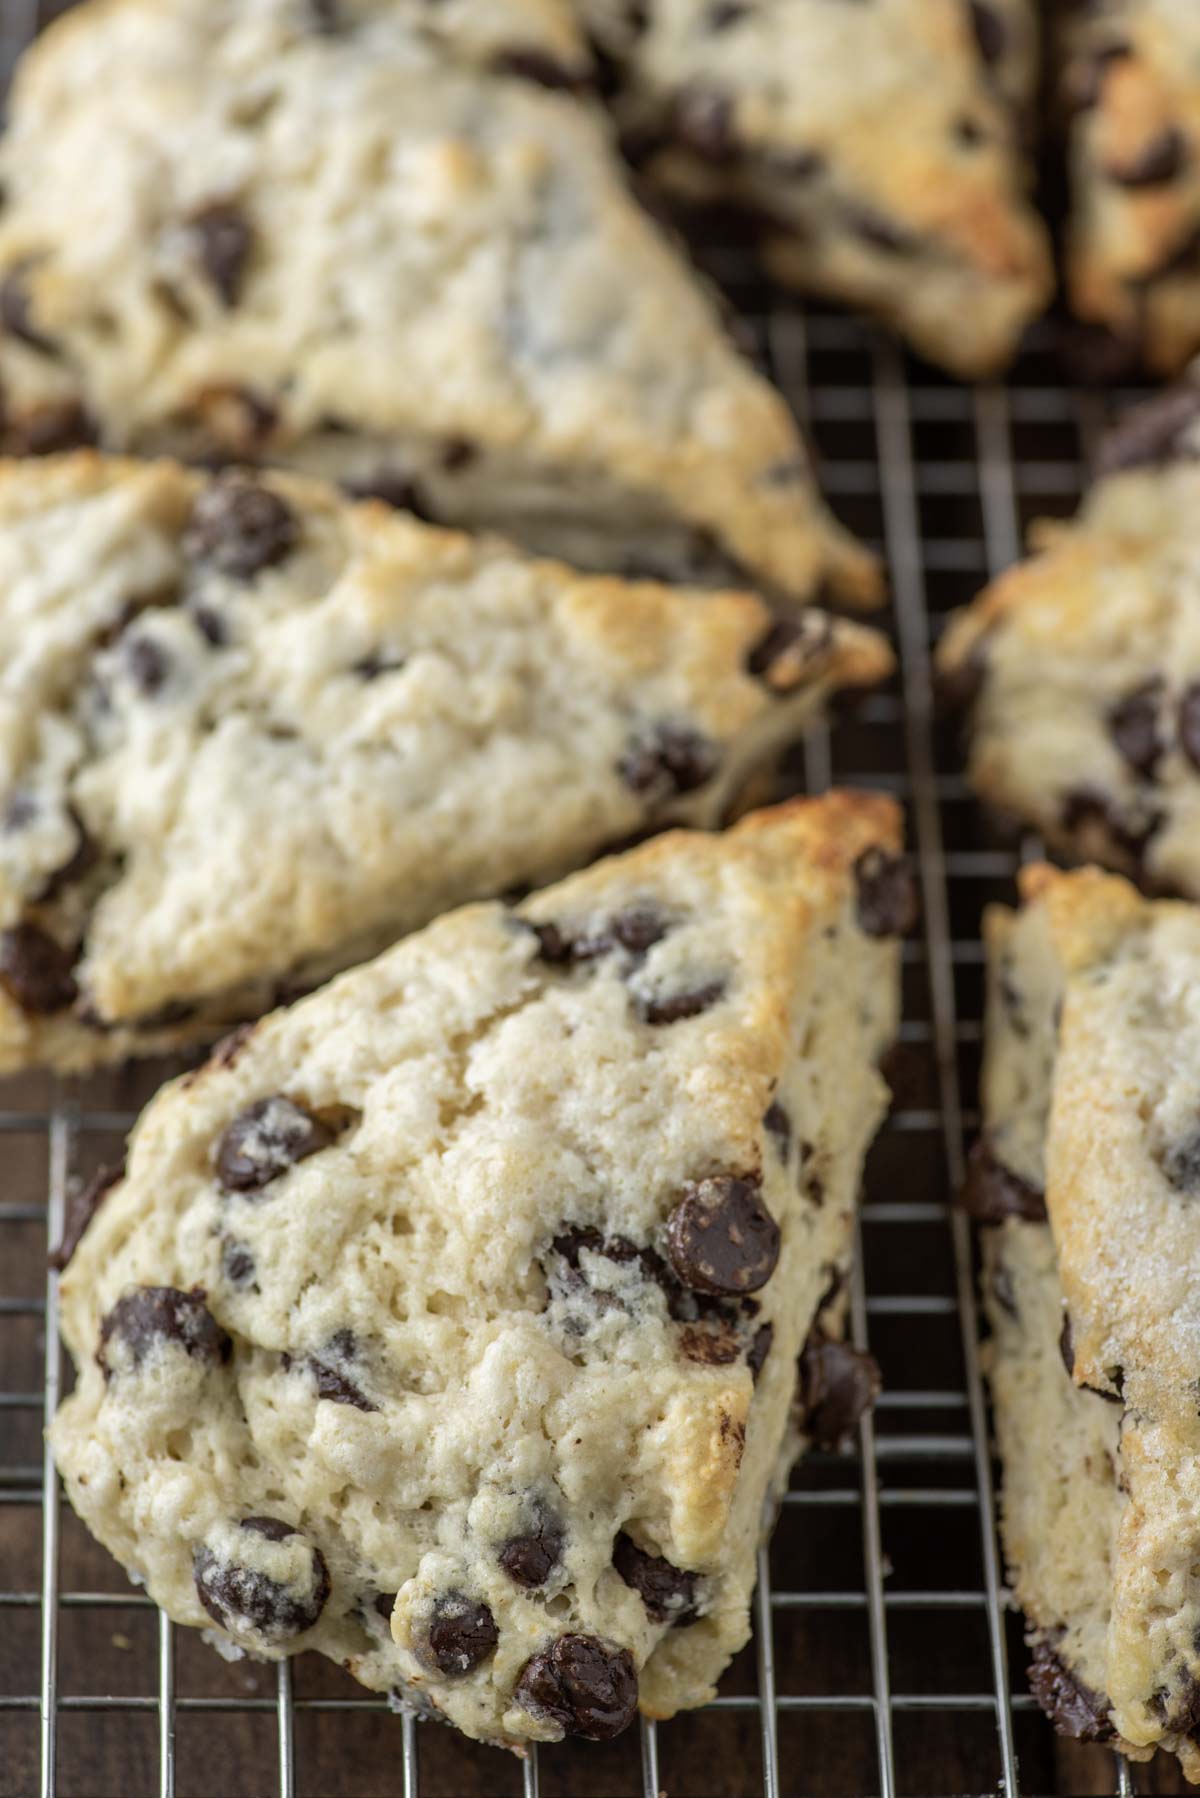
- Bake for 22-25 minutes until tops are golden brown and toothpick inserted comes out clean. Cool on a wire rack.
Homemade Buttermilk
If you don't have buttermilk you can easily make it at home. Simply add 1 tablespoon of vinegar or lemon juice to 1 cup of milk. Let stand at room temperature for 10 minutes and it’s ready.
The Key to Light and Flaky Scones
As with anything that you bake, you do not want to overwork the dough. Use a pastry cutter or knives to get the cold butter into small crumbs.
You then use your hands to shape and pat the dough into a disc. Yes your hands will get messy, but the end product is worth it.
Freezing Instructions
You can either freeze the chocolate chip scones before baking or after baking.
- Freeze Before Baking: Cut the scone dough into wedges than place on baking sheet and freeze for 1 hour. Once frozen, you can layer them into a bag or container. To bake from frozen, just add a few minutes to the bake time or thaw overnight and bake as directed.
- Freeze After Baking: Place the baked and cooled scones on a sheet and the freeze for at least 1 hour. You can then layer them into a bag or container. Thaw on the counter or overnight in the fridge. Warm in the microwave for 30 seconds or on a baking sheet at 300°F for 10 minutes.
FAQs
Yes and no. Scones are the British version and generally have eggs in them, where biscuits do not. However I've "Americanized" these homemade scones and taken the egg out which gives you a light, flaky texture.
As mentioned above, eggs are commonly in scones as it gives it a richer mouthfeel. However I like a flakier scone so I omit the egg.
You can break one open to check for doneness. The interior shouldn't be doughy or wet, but slightly moist.
Pro Tips/Recipe Notes
- You may not realize this but baking powder/baking soda actually expires pretty quickly. Use baking powder that is less than a year old since it has been opened. If you use older baking powder, it won’t be powerful enough to help leaven the scones. You can test it by stirring half a teaspoon of baking powder into a cup of hot water. It will immediately start to fizz and release carbon dioxide gas if it’s still fresh enough to use. Baking soda should be less than six months old and you can use the same test.
- Use cold or even frozen butter. The cold butter coats the flour which creates crumbs that melt and steam, thus creating that flakiness you expect in scones.
- Do not overwork the dough. Mix everything until just combined or you will have tough scones.
- Leftover scones will keep at room temperature for 2 days or in the fridge for 5 days.
Other Breakfast Recipes
If you’ve tried these chocolate chip scones or any other recipe on Chisel & Fork, please let me know how it turned out in the comments below! You can also follow me on Facebook, Instagram, Pinterest and YouTube to see more tasty meals and anything else I'm up to.
Chocolate Chip Scones
Ingredients
- 2 cups all-purpose flour
- ¼ cup sugar
- 1 ¼ teaspoon baking powder
- ¼ teaspoon baking soda
- ¼ tsp salt
- ½ cup unsalted butter, cold
- 1 cup dark chocolate chips
- ¾ cup buttermilk
- 1 tsp vanilla extract
Instructions
- Preheat oven to 400°F. Whisk together flour, sugar, baking powder, baking soda, and salt in a large bowl.
- Grate the cold butter using a cheese grater. This is an easy way to get it into small pieces to incorporate in the dry ingredients. If you do not have a cheese grater, you can just cut into small cubes. Blend the grated butter in with the flour mixture using a pastry cutter or 2 knives. The mixture should be clumpy and look like course crumbs. Mix in the chocolate chips.
- In a small measuring cup, mix together the buttermilk and vanilla. Mix into the flour mixture until JUST incorporated. DO NOT over mix, this will make the scones too dense.
- Put a small amount of flour onto a clean surface and knead the dough briefly. Shape the dough into a circle that is about 1 ½ inches thick. Cut the circle in half and then each half into 4-5 wedges (depending on how big you want your scones).
- Put the wedges on a baking sheet covered with parchment paper. Brush the tops with a little bit of milk and then lightly sprinkle with sugar.
- Bake for 20-22 minutes until tops are golden brown and toothpick inserted comes out clean. Cool on a wire rack.
Notes
- You may not realize this but baking powder/baking soda actually expires pretty quickly. Use baking powder that is less than a year old since it has been opened. If you use older baking powder, it won’t be powerful enough to help leaven the scones. You can test it by stirring half a teaspoon of baking powder into a cup of hot water. It will immediately start to fizz and release carbon dioxide gas if it’s still fresh enough to use. Baking soda should be less than six months old and you can use the same test.
- Use cold or even frozen butter. The cold butter coats the flour which creates crumbs that melt and steam, thus creating that flakiness you expect in scones.
- Do not overwork the dough. Mix everything until just combined or you will have tough scones.
- Leftover scones will keep at room temperature for 2 days or in the fridge for 5 days.


Karen G says
I’m a scone lover, and this was my first ever attempt at making scones. I followed the recipe exactly, and they turned out perfect! I will definitely make these again for guests.
Ryan says
Glad you enjoyed them! We just made them yesterday again!
C. Murphy says
Made these yesterday and they are outstanding! I used mini chocolate chips so you get a little chocolate with every bite. Easy recipe and definitely the best scones I've ever had.
Ryan says
Never go wrong with more chocolate!
Crystal says
I've made this recipe probably half a dozen times now. I've made it with different size and flavor chocolate chips. My favorite combo is dark chocolate and mini semi-sweet. Comes out perfectly each time.
Ryan says
Glad you enjoy it!
Karen says
Never made scones before, but these were delicious! Only baked them for 20 minutes and they came out perfect! Better than the ones we buy at a bakery. Thank you for the great recipe!
Ryan says
Awesome!
Jennifer says
This is by far the best scone recipe I have come across! Just made them and they were absolutely delicious - a bit of a crunch to the outside and nice and soft in the middle. Will definitely make again! Thank you so much!
Chris says
Delicious!
Jani says
I made these today. Saving them for breakfast tomorrow.......if we can resist that long. They look and smell delicious!
Ryan says
Don't resist! Eat them now!
Olivia says
Great recipe! Followed this recipe for my first go at making scones and they came out amazing.
Ryan says
Awesome!
Nanette says
First time in making scones. Tried this recipe and the scones turned out great.
Ryan says
Glad you liked them!
Blakni Riley says
This recipe does not disappoint! My first time ever making scones and it was a hit! I’m already about to make more!
Ryan says
Glad to hear!
Rachel Schwartzman says
Never made scones in my life and these turned out awesome! Simple recipe for a novice 🙂
Ryan says
Glad you enjoyed them!
Sherry says
Absolutely loved this! Also appreciated that it’s was easy to convert to vegan! Thank you!
MSG says
Delicious!! Will make again!
Susanne F. says
Oh, my...these scones are FABULOUS! Your recipe was easy to follow, and I greatly appreciated your tips. I will be proud to serve these to guests, because they are so much better than anything I’ve ever bought. These are a new favorite in our household. Thanks for posting this recipe.
Ryan says
Glad you enjoyed them!
Elizabeth says
Loved these! This was the first time I've ever tried making scones and this was so easy. Super delicious and will definitely be making them again!
Ryan says
Glad to hear!
Tosha Chaffin says
I was wondering could this recipe also be used with blueberries instead of chocolate chip has anybody tried it?
Ryan says
Yes you can. I actually have a scone recipe where you can use dried or fresh - https://www.chiselandfork.com/blueberry-scones/.
Barbara says
I loved making these scones! huge hit! I am wondering if anyone has tried to make this recipe gluten free? Thanks!
Ryan says
I haven't tried them with gluten-free flour so not sure how they would turn out. If you try it, let me know!
Peyton says
I have made these scones a handful of times now, and they are delicious. Not only are they the best scones I have ever had, but this is my favorite recipe of all time. So incredibly easy to make, they taste incredible, and have turned out perfect each time I have made them. Thank you so much for this amazing recipe! Cannot recommend it enough.
Ryan says
So glad you like them!
Flo says
Can you use heavy cream instead of butter milk ?
Ryan says
You can but I'd suggest just adding 1 tbsp of white vinegar to the heavy cream as you need some acid.
Ariana says
I've never made scones before, but I just tried these and they turned out great! I'm vegan so I used coconut oil instead of butter and almond milk with vinegar instead of buttermilk, and they're still pretty flaky and moist. Will make again!
Ryan says
Great to hear!
Megan says
Excited to try these! Needed an egg free recipe due to allergies so this is perfect.
Ryan says
Hope you enjoy!
Julia says
Made these last night, the scones turned out moist and delicious.
Great recipe, thank you.😋
Ryan says
Definitely a favorite of mine.
Vicky says
Taste great, light vs dense. 400 might be a little high for my oven. Will try at 360-380 next time. Baked 15 min at 400.
A few of the thicker ones I left in the oven while it was cooling.
Sheila DelCharco says
Made these today and they were great! Came out perfectly! Was running out of milk so I topped off with half and half. Crispy corners and fluffy inside. Yum!! I can see making variations on these with fruit, nuts , spices. Thanks for sharing these!
Ryan says
Glad you enjoyed them!
CA says
Very good and easy for someone like myself who is more of a cook than a baker. Mine came out a bit darker than pictured here but the inside if moist and tender. I let mine go 22.5 minutes, could have pulled them out at 20. Next time! Thanks for a yummy recipe.
Diane Wagner says
Will milk chocolate chips work?
Ryan says
Yep! Any type of chocolate chip works with these.
Juanita says
Oh my goodness these were SO GOOD! Easy to make and turned out perfect! YUM…
Ryan says
Definitely a favorite!
Cheryl Wertz says
I tried this chocolate chip recipe tonight. It was so easy to put together and I had no issues whatsoever. I’ve tried many recipes over the last couple of weeks and this is the best one. They turned out so delicious. A slight sweet crunchiness on the outside and very soft on the inside.
Ryan says
They are a favorite of ours!
Shannon says
I just made these, following the recipe exactly. They are great! I love the flaky texture. My only issue is that some of my chocolate chips leaked out and got a bit burnt around the bottom edges of the scones. I think it's because I used large Ghirardelli chips instead of small normal ones, or maybe I should try a different oven rack next time.
Magen Kirby says
This recipe is amazing. So much better than the last recipe I tried for scones. I was nervous about over working the dough, and I probably did a little however they came out perfectly.
PatS says
Texture and taste great. That said, not sure what I did wrong. The dough was more like cookie dough so had to scoop into roundish scones on tray. No way I could have flattened and cut into triangles. Any ideas?
Ryan says
Might have just not been mixed enough. It leans to a wet batter so your hands do get a little messy.
C. F. says
Best scone I've ever had!! I only had frozen butter but it worked out great with the cheese grater.
Nat says
Love these (though I use semi-sweet chocolate chips instead of dark). They're always a hit when I make them. The only problem is that the bottoms of mine always get way too dark, sometimes to the point of burnt, while the tops and insides are perfect. I can't figure out what I'm doing wrong.
Ryan says
Hmm. Maybe to offset it, move the scones up one rack in the oven.
Sarah says
Just made these today and they were absolutely scrumptious! My favorite scone recipe I’ve used thus far - super flaky and tasty! Only things I changed were using semisweet chocolate chips and I also made 12 scones instead of 10. But I baked them for 16 mins and they came out a perfect golden brown. Yum!!
Ryan says
Glad you enjoyed them!
Andrea says
I don’t have unsalted butter.
What do I. Need to do if using salted butter?
Ryan says
Just omit the salt.
Tamia says
So easy and amazingly delicious! God bless
Marissa says
Can I use heavy whipping cream instead of buttermilk?
Ryan says
Yes but the texture will be slightly different. The acidity from the buttermilk helps with the flakiness and rise.
Candace says
Is a weight measurement available for the flour? I used 2 spooned cups and the dough was SO wet. I know it's a wet mix but it was impossible to cut. I got piles more than wedges.
Ryan says
250 grams should work.
Katie says
These turned out great! My first time making scones. I added an extra teaspoon of vanilla. Will definitely make them again. Thank you!
Shannon says
I just made this for first time and I have made scones before but not with buttermilk. My husband and I love going to this local bakery for them and we have had them while in Ireland. THIS RECIPE IS AMAZING. Amazing how well it turned out right out of the gate if you follow instructions and trust the process. Wow thank you!
Ryan says
Glad you enjoyed them!
Jessica says
Made this recipe today and they came out delicious.
Rose says
First time scone maker they were delicious very easy to do just like biscuits my daughter-in-law love them she says they taste better than the Starbucks scones, this recipe is a keeper I will make them again
Ryan says
Glad you liked them!
Holly says
LOVED these! So yummy! I didn't have any milk, so I used heavy cream to brush the tops and. it turned out great! I will definitely make them again.
Ryan says
Glad you enjoyed them!
Linda says
Delicious scones! I skipped shaping the dough -just made them drop. Subbed whole wheat flour for 1/2-added oatmeal & flax seed & added vanilla.I used a combo of brown sugar & honey in place of granulated for more flavor. Put a cream cheese glaze on top & sliced almonds on some. Baked at only 450’ & for just 11’(maybe because I made them smaller). Definitely need to keep an eye on them or turn down oven temp if your oven runs hot. I will make these again!
Bri says
These are great! Can you substitute cinnamon chips for the chocolate?
Ryan says
Yeah definitely!
Evelyn Rocha says
Soooo delicious!!! My family loved them.
I love how crispy the edges got and how soft they were inside. This recipe will definitely be my go to. I didn’t have vanilla extract so I used orange extract instead. Amazing!
Ryan says
Oh like the orange extract addition!
Christina says
I had tried twice to use a different recipe for scones and both times the texture was off. This one worked out perfectly!
I did put the mix in the freezer for about 5 minutes after cutting in the butter to give it another chance to chill out, which I think was helpful. I also used espresso chocolate chips and added two teaspoons of espresso powder to the dry ingredients.
The dough came out pretty wet when I first tipped it out onto the counter to knead, but I added a bit more flower and it came together.
20 minutes was a touch too long for my oven - will try removing them at 18 next time.
Definitely a winner!!
Ryan says
Love the idea of espresso chocolate chips!
Rebekah says
Can I make the dough the night before and keep in the fridge?
Ryan says
Yes you can.
Nancy Bakker says
This looks super nice. I will try it for our Christmas breakfast.
Thank you.
One question, can i make this up front and freeze it?
Ryan says
Yes you can. You can either freeze the dough and then bake. It just takes a couple minutes longer. Or freeze after baking then reheat at 350F for about 10 minutes.
Traci says
First time making scones and these were amazing! Easy to follow directions! Looking forward to trying more recipes.
Ryan says
Definitely one of my favorites.
Sarah says
First time making scones- absolutely delicious! Mine only took about 15 min in the oven at 400. Definitely will be making these again!
Ryan says
Glad you enjoyed!
Brian Halleck says
If I wanted to add eggs, how many should I add to this recipe?
Ryan says
Add 1 egg and then reduce the buttermilk to 1/2 cup. You still want to get 3/4 cup total liquid.
Elena says
Super good and easy!! Followed the recipe exactly and they turned out wonderful!
Ryan says
Glad you enjoyed them!
Cynthia says
Can you substitute sour cream for the buttermilk?
Ryan says
Yes you can actually!
Elise says
Hi! These are delicious! My scones are rising, but I don’t know if they are rising as much as they are suppose to. I’m not sure if maybe I am cutting them too thin. I notice my dough to have a lot of extra little crumbs left in the bowl when I transfer over to cut the scones is that normal or should I add a little extra buttermilk? They still come out delicious and look like scones but just trying to perfect it haha! Thank you!
Ryan says
A couple of things. Make sure your leaveners aren't expired. Also if you have some extra crumbs, mix them in add the end when your forming into a disc. I wouldn't add extra buttermilk. Hope they turn out great!
Alexis B says
This was so easy to make, the instructions were clear and in little time I had 8 tasty scones! Would highly recommend to others
Ryan says
Glad you enjoyed them!