


This post may contain affiliate links. Please read my disclosure.
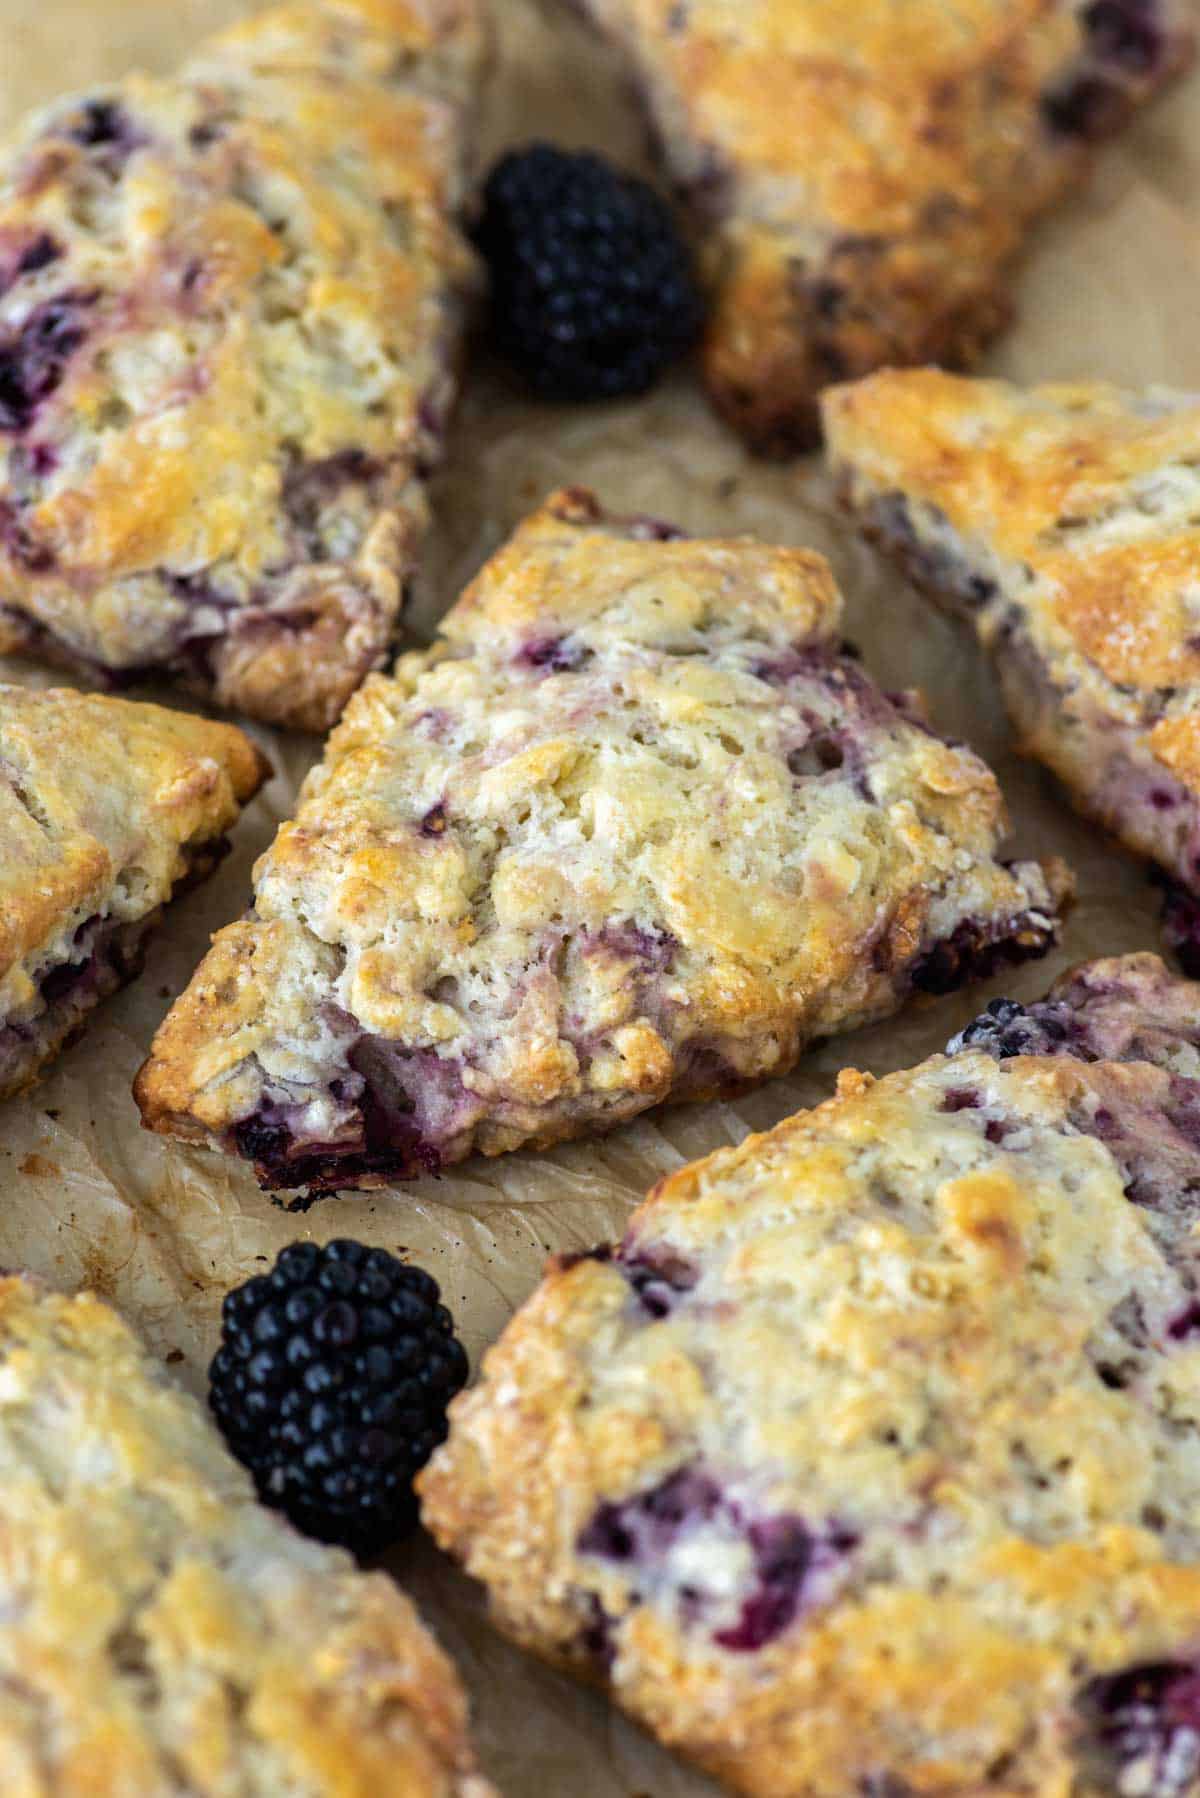
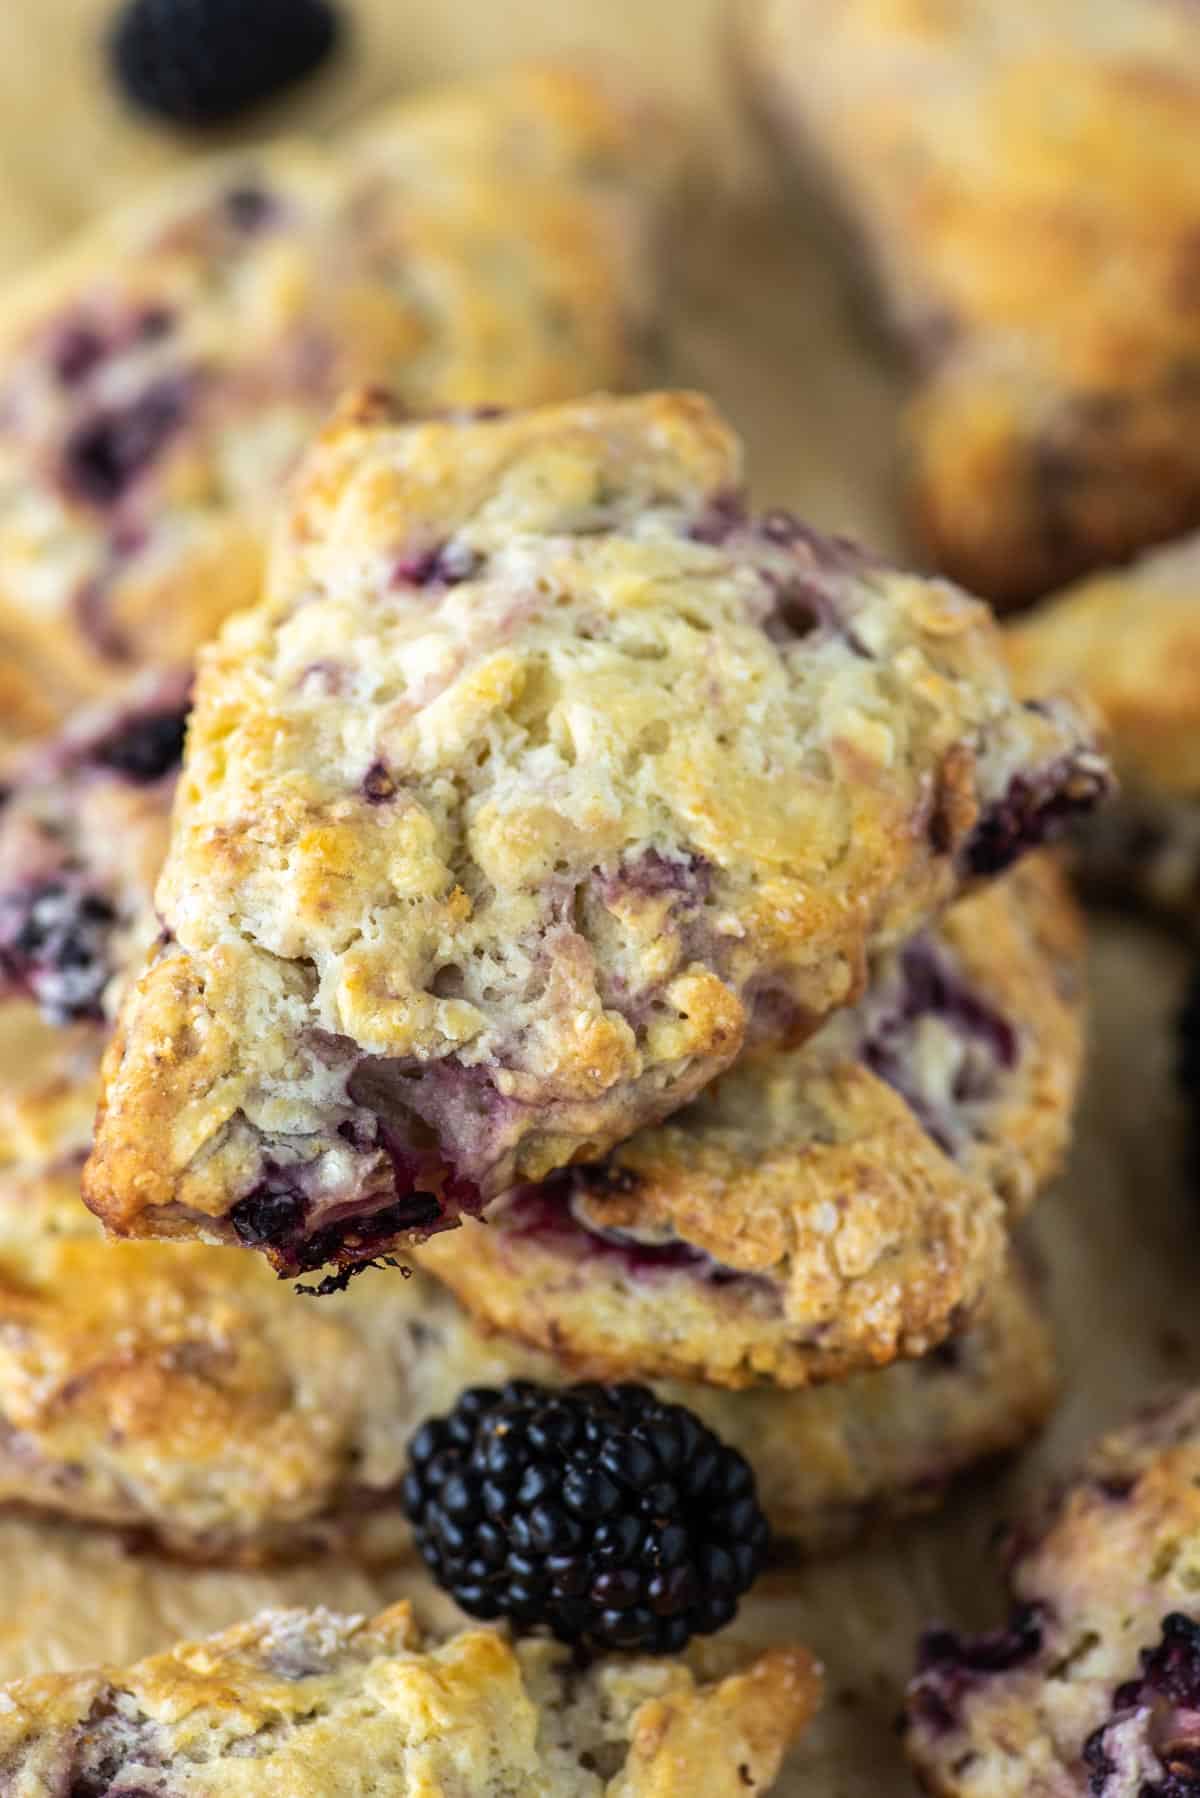
This blackberry scones recipe is loaded with fresh blackberries, giving them a slightly sweet, tart and buttery taste that melts in your mouth. It is perfect for breakfast or an afternoon snack.
I'm all about scones, from blueberry scones to raspberry and white chocolate scones to chocolate chip scones to apple scones to bacon cheddar scones.
If you aren't familiar with scones, they are pretty much biscuits with a little bit of sugar. I imagine like most Americans, I didn't have many scones growing up. But watching The Great British Baking Show constantly made me crave them.
So I got to work on creating a base recipe that works with many ingredients. And that's where these blackberry scones come into play. If you've never made them, you'd be surprised how easy they are to whip together.
You simply whisk together some dry ingredients before mixing in some buttermilk and the shaping into a disc. Just cut to size and then bake. It really isn't too complicated. Of course with this recipe, you add in blackberries which gives you pops of tart/sweet flavors throughout.
So if you are looking for something to go with that cup of coffee in the morning, these scones should be on the list.
Jump to:

Ingredient Notes
- Baking powder/soda - super important as it helps the homemade scones rise.
- Unsalted butter - by shredding the butter you get bits throughout the flour which help creates the flaky crust you expect.
- Blackberries - you want fresh blackberries if possible and cut them up so you can get some in every bite.
- Buttermilk - the acidity reacts with the leaveners and creates a nice rise.
Ingredient Swaps
Like any recipe, you can mix up some of the ingredients if needed. Some variations include:
- While I use all-purpose flour, whole wheat flour can be substituted.
- I use granulated sugar in the dough and to top the scones, but raw can sugar or coconut sugar work too.
- It is a blackberry scones recipe for a reason, but you can sub with another fruit like blueberries or strawberries or even make cherry scones.
Step-by-Step Photos
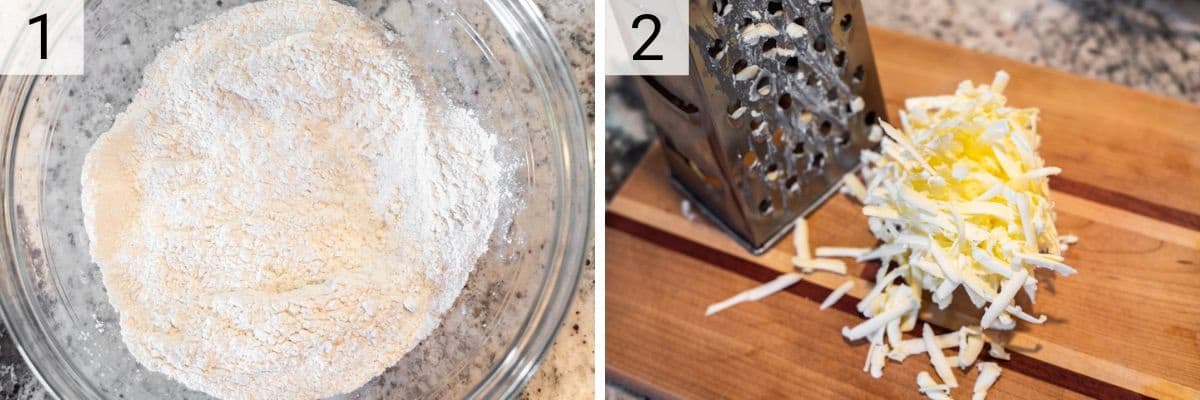
Mix together the dry ingredients in a large bowl then use a cheese grater to shred the cold butter.
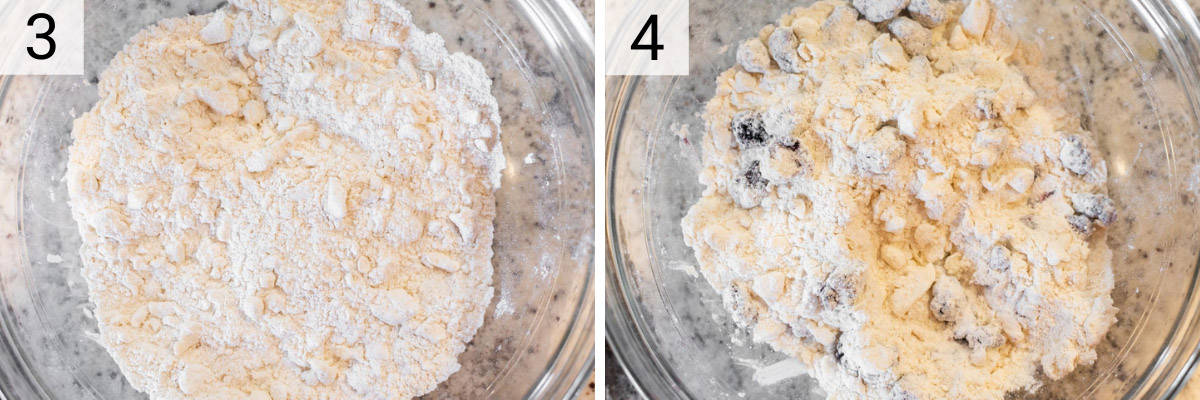
Add the butter to the flour mixture and use a pastry cutter or 2 knifes to mix in and then fold in the blackberries.
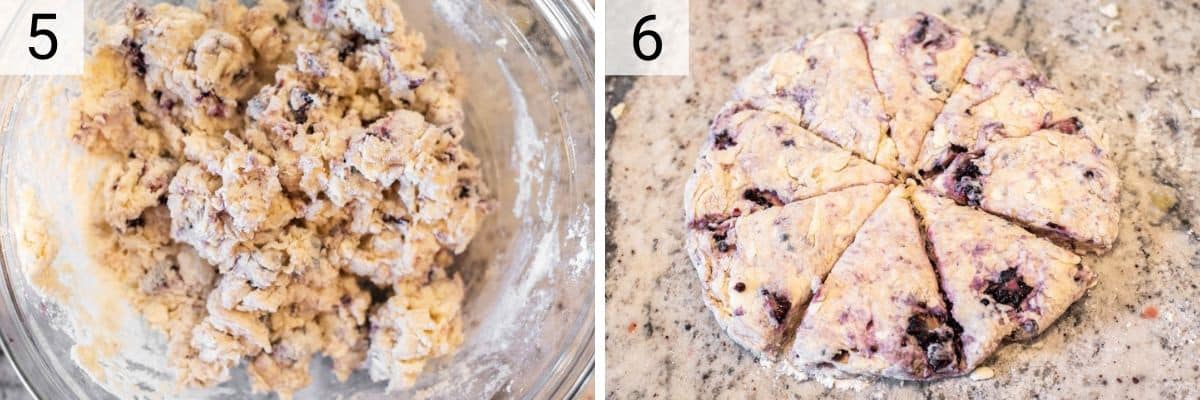
Mix the buttermilk and vanilla extract into the dry ingredients until just incorporated. Then place the dough on a floured surface and form into a disc about 1 ½ inches thick. Cut into 8-10 slices.
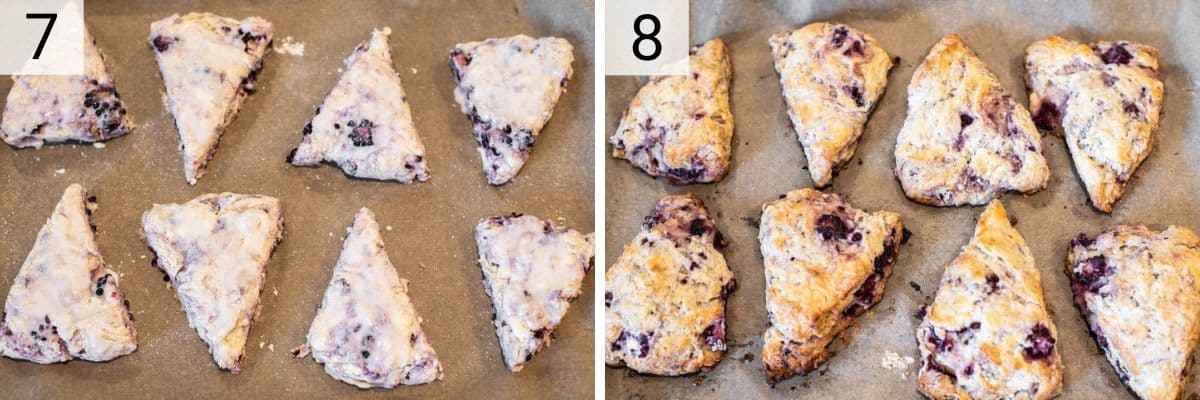
Place the blackberry scones on a parchment-lined baking sheet. Brush with some buttermilk and add a little bit of sugar. Bake at 400°F for 22-25 minutes or until golden brown on top.
The Key to Light and Flaky Scones
As with anything that you bake, you do not want to overwork the dough. Use a pastry cutter or knives to get the cold butter into small crumbs.
You then use your hands to shape and pat the dough into a disc. Yes your hands will get messy, but the end product is worth it.
FAQs
Yes and no. Scones are the British version and generally have eggs in them, where biscuits do not. However I've "Americanized" these homemade scones and taken the egg out which gives you a light, flaky texture.
If you don't have buttermilk you can easily make it at home. Simply add 1 tablespoon of vinegar or lemon juice to 1 cup of milk. Let stand at room temperature for 10 minutes and it’s ready.
Yes. If using frozen, no need to thaw them. If using dried blackberries, just reduce the amount to ¾ cup.
As mentioned above, eggs are commonly in scones as it gives it a richer mouthfeel. However I like a flakier scone so I omit the egg.
You can break one open to check for doneness. The interior shouldn't be doughy or wet, but slightly moist.
Freezing Instructions
You can either freeze the blackberry scones before baking or after baking.
- Freeze Before Baking: Cut the scone dough into wedges than place on baking sheet and freeze for 1 hour. Once frozen, you can layer them into a bag or container. To bake from frozen, just add a few minutes to the bake time or thaw overnight and bake as directed.
- Freeze After Baking: Place the baked and cooled scones on a sheet and the freeze for at least 1 hour. You can then layer them into a bag or container. Thaw on the counter or overnight in the fridge. Warm in the microwave for 30 seconds or on a baking sheet at 300°F for 10 minutes.
Pro Tips/Recipe Notes
- Use cold or even frozen butter. The cold butter coats the flour which creates crumbs that melt and steam, thus creating that flakiness you expect in scones.
- Do not overwork the dough. Mix everything until just combined or you will have tough scones.
- Leftover blackberry scones will keep at room temperature for 2 days or in the fridge for 5 days.
Similar Recipes
If you’ve tried this blackberry scones recipe or any other recipe on Chisel & Fork, please let me know how it turned out in the comments below! You can also follow me on Facebook, Instagram, Pinterest and YouTube to see more tasty meals and anything else I'm up to.

Blackberry Scones
Ingredients
- 2 cups all-purpose flour
- ¼ cup granulated sugar
- 1 ¼ teaspoon baking powder
- ¼ teaspoon baking soda
- ¼ tsp salt
- ½ cup unsalted butter, cold
- 1 cup blackberries, cut into quarters
- ⅔ cup buttermilk
- 1 tablespoon vanilla extract
Instructions
- Preheat oven to 400°F. Whisk together flour, sugar, baking powder, baking soda, and salt in a large bowl.
- Grate the cold butter using a cheese grater. This is an easy way to get it into small pieces to incorporate in the dry ingredients. If you do not have a cheese grater, you can just cut into small cubes. Blend the grated butter in with the flour mixture using a pastry cutter or 2 knives. The mixture should be clumpy and look like course crumbs. Mix in the blackberries.
- In a small measuring cup, mix together the buttermilk and vanilla. Mix into the flour mixture until JUST incorporated. DO NOT over mix, this will make the scones too dense.
- Put a small amount of flour onto a clean surface and knead the dough briefly. Shape the dough into a circle that is about 1 ½ inches thick. Cut the circle in half and then each half into 4-5 wedges (depending on how big you want your scones).
- Put the wedges on a baking sheet covered with parchment paper. Brush the tops with a little bit of milk and then lightly sprinkle with sugar.
- Bake for 20-22 minutes until tops are golden brown and toothpick inserted comes out clean. Cool on a wire rack.
Notes
- Use cold or even frozen butter. The cold butter coats the flour which creates crumbs that melt and steam, thus creating that flakiness you expect in scones.
- Do not overwork the dough. Mix everything until just combined or you will have tough scones.
- Leftover scones will keep at room temperature for 2 days or in the fridge for 5 days.

Alyssa says
Hi! I'm not sure why, but this dough came out so sticky I couldn't knead it! I had to keep adding more flavor and though I think I got them to a good consistency (in the oven now, fingers crossed!) is there something I could've done to avoid that? Thanks!
Ryan says
It is definitely a sticky/slightly messy dough just like biscuits. How did they turn out?
Mary Lindsay says
These were INCREDIBLE! Saving this recipe for many more years to come. Thank you
Ryan says
Glad you enjoyed them!
Petrea Walsh says
Absolutely delicious,I did add a little more flour the dough was very wet
and they were perfect 👍
Ryan says
Glad you enjoyed them!
Sarah says
Awesome tender scones. Followed recipe exactly and they came out perfect. I will try it with Blueberries next. Thanks
Stacy says
Quite possibly the best scone I have ever made. The fresh blackberries I had were really sweet, not the giant tasteless ones. I thought the dough might have been a little too wet but they were FANTASTIC! I used organic spelt flour. Thank you- this was a real treat!
Ryan says
Glad you enjoyed them!
Kathy Smithers says
Can you use frozen berries
Ryan says
Yes. No issue there!
Honara says
If using frozen do you need to thaw first?
Ryan says
If not baked, just bake a couple extra minutes. No need to though. If already baked I'd just throw in the oven at 350 for about 8 minutes or until warmed through.
Nancy Waterhouse says
Lovely recipe that worked perfectly as written for me. My blackberries were wild and so I left them whole. A keeper!
Ryan says
Can never go wrong with wild blackberries!
Cori says
The dough was so wet I wasn’t able to work the dough at all. I used a scone pan to get the shape. Tasted good.
Ryan says
Yes the dough is wet. Just make sure you have floured hands and a surface. Glad it tasted good!
Valerie says
AMAZING!! Substituted 1:1 gluten free flour and these turned out to be one of the best gluten free treats I have ever had. I shared them with family and friends who all were shocked that it was gluten free. Also made a light drizzle with powdered sugar, milk, almond and vanilla extract to top it. So glad to have come across this website - we love every recipe from it!!
Ryan says
Glad you enjoyed them!
laura pepin says
These turned out great - not too sweet with an addictive taste. Thank you.
Ryan says
Glad you enjoyed!