This post may contain affiliate links. Please read my disclosure.
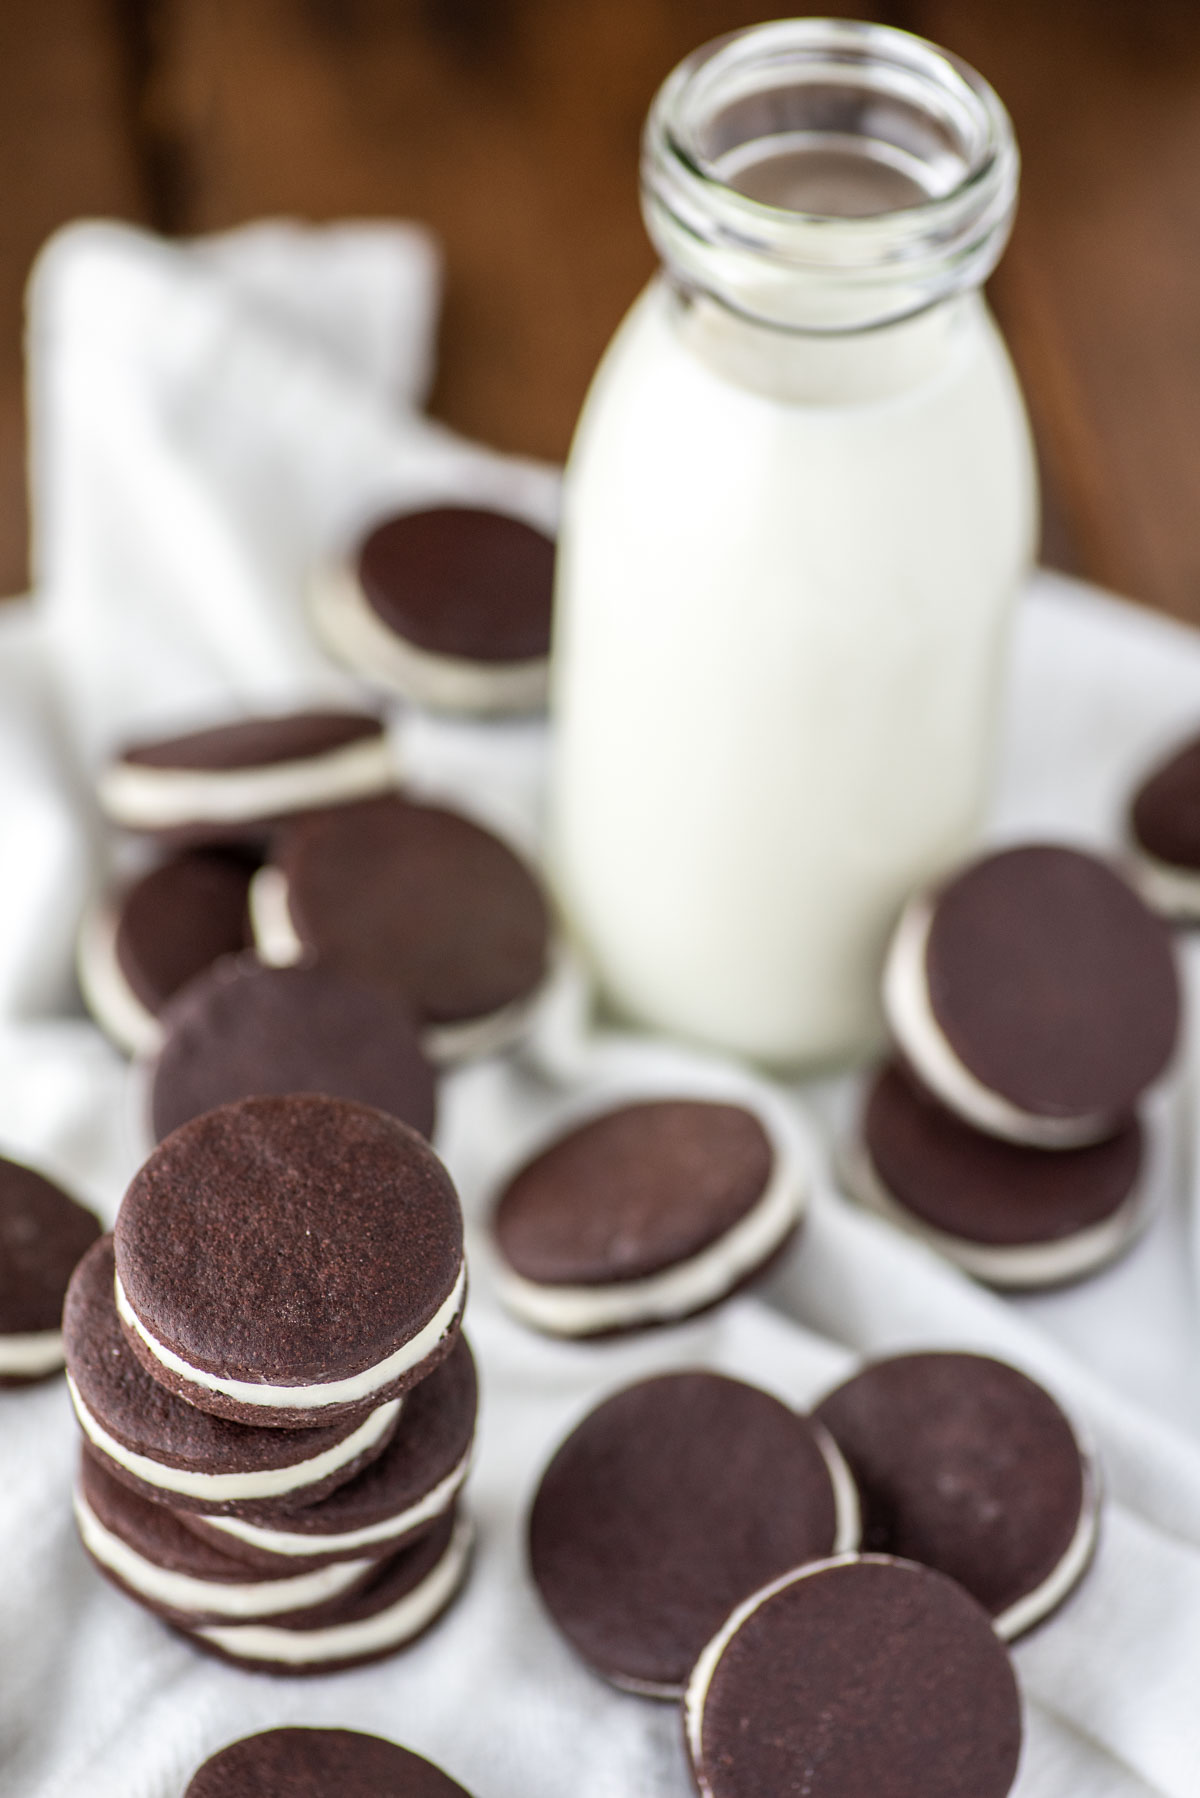
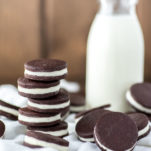
These homemade Oreos are an easy DIY version of the classic cream-filled chocolate cookie and will have you wondering why you've never made them before.

I mean who doesn't love the classic Oreo? Ask around and you won't hear many no's. I mean it's the best-selling cookie in the world for a reason. One thing I've found over time is everyone eats their Oreos a certain way and I'm no different.
I will admit I might be a little weird with mine, but let me share how I eat a 6 pack of Oreos. I take every single Oreo out of the package then proceed to do my best to separate the cookies from the filling with the goal of having one cookie with no filling and one with all the filling.
Sadly this almost never happens as there is always some cookies that get a little filling on both when separating them. I then proceed to eat the cookies in order from least filling to most filling and dunk each in milk of course. Because who can have Oreos without milk? So now that I've share my way of eating them, how about you?
But getting back to these homemade Oreo cookies, you might be asking, why the need to recreate something that you can easily just buy at the store? Well for me, I just thought it would be fun to make something I grew up eating all the time. And I wasn't wrong!
Yes it's more work than just buying them, but with homemade Oreos, you get to control the amount of frosting in the middle. Before you say these are too hard to make, believe me they are surprisingly easy. Big thing is to get them to the correct thickness before baking, which is ⅛". So if you're feeling up for the challenge, give these Oreos a try. You could even use them to make some Oreo biscotti. Or if you want it in tart form, try this Oreo tart.
Jump to:
Recipe Ingredients
- Unsalted butter - used for the cookie and filling.
- Granulated sugar - adds sweetness.
- Salt - enhances the flavor.
- Egg - helps bind everything together.
- All-purpose flour - the base of the dough.
- Dark cocoa powder - adds a deep chocolate flavor.
- Confectioners sugar - sweetens the filling.
- Vanilla extract - adds a slight vanilla flavor to the filling.
Step-by-Step Instructions
- In a stand mixer with paddle attachment, beat the butter, sugar and salt on medium speed for 4-5 minutes or until light and fluffy. Beat in the egg until combined, scraping down the sides as needed.
- Sift the flour and cocoa powder in medium bowl. With mixer on low speed, slowly add the flour mixture and mix until the dough is just combined.
- Turn the dough on a surface and form into flat square. Wrap in plastic wrap and place in fridge for 1 hour.
- Preheat oven to 350°F. Remove the dough and cut into 4 equal pieces. Roll out the dough to ⅛" thickness between two pieces of parchment paper.
- Use a small cookie cutter to cut individual rounds and place on parchment-lined baking sheet.
- Bake for 15 minutes, rotating halfway through. Remove from oven and transfer to cooling rack.
- While Oreos are cooling, make the cream filling. In a stand mixer with whisk attachment, beat together the butter, sugar and vanilla extract until light and fluffy, about 3 minutes.
- Assemble the cookies by adding ½ tablespoon of the cream between two cookies and pressing together. Scrape away the excess cream.
Variations
You really can go crazy with your Oreo flavors:
- Mint cream - Add ¼ teaspoon peppermint extract
- Peanut butter cream - Use same amount of cream ingredients, but add 1 cup peanut butter and 3 tablespoon of milk or heavy cream
- Chocolate cream - Use same amount of cream ingredients, but add ¼ cup unsweetened cocoa powder and 2 tablespoon milk
Pro Tips/Recipe Notes
- Dark cocoa powder is the key to homemade Oreos. You don't get that dark color the Oreo is known for with regular cocoa powder. Hershey's Special Dark Cocoa is my go-to.
- Roll the dough between two pieces of parchment paper so it doesn't stick.
- If you want slightly softer cookie, bake for 12-13 minutes or slightly crunchier, bake for 17-18 minutes. For me, 15 minutes created the right consistency.
- Homemade Oreos will last about two weeks in an airtight container at room temperature. You can also freeze for up to three months.
Other Dessert Recipes
- Congo Squares
- Cherry Macarons
- Oreo Mug Cake
- Maple Walnut Fudge
- Brown Butter Chocolate Chip Cookies
- Nutella Biscuits
- Chocolate Sugar Cookies
- Ginger Cookies
If you’ve tried these homemade Oreos or any other recipe on Chisel & Fork, please let me know how it turned out in the comments below! You can also follow me on Facebook, Instagram, Pinterest and YouTube to see more tasty meals and anything else I'm up to.
Homemade Oreos
Ingredients
Cookie
- 1 stick (½ cup) unsalted butter at room temperature
- ½ cup granulated sugar
- ¼ teaspoon salt
- 1 large egg
- 1 cup + 2 tbsp all-purpose flour
- ½ cup unsweetened natural dark cocoa powder
Cream Filling
- 12 tablespoon unsalted butter at room temperature
- 3 cups confectioners sugar
- 1 teaspoon vanilla extract
Instructions
- In a large bowl using a hand-held mixer or stand mixer fitted with a paddle attachment, beat the butter, sugar and salt on medium speed for 4-5 minutes or until light and fluffy. Beat in egg until combined. Scrape down the sides and bottom of the bowl as needed.
- Sift the flour and cocoa powder together in a medium bowl. On low speed, slowly add flour mixture to butter mixture. Do not overmix but make sure all the flour is incorporated.
- Turn the dough onto a surface and push together into a flat square. Wrap in plastic wrap and place in fridge for 1 hour.
- Preheat oven to 350°F. Remove dough and divide into 4 equal pieces. Place the dough between two pieces of parchment paper and roll to ⅛" thickness. Use a small circle cookie cutter and cut into individual rounds and place on a parchment-lined baking sheet. Leave at least ½" between each cookie.
- Bake for 15 minutes, rotating the pan halfway through. Remove from oven and transfer to cooling rack.
- While cookies are cooling, make cream filling. In a large bowl using a hand-held mixer or a stand mixer fitted with a whisk attachment, beat the butter, sugar and vanilla extract until light and fluffy, about 2-3 minutes.
- Assemble the cookies by spreading ½ tablespoon of filling between two cookies and press. Scrape away the excess filling to even out the sides.
Notes
- Dark cocoa powder is the key to Oreos. You don't get that dark color the Oreo is known for with regular cocoa powder. Hershey's Special Dark Cocoa is my go-to.
- Roll the dough between two pieces of parchment paper so it doesn't stick.
- If you want slightly softer cookie, bake for 12-13 minutes or slightly crunchier, bake for 17-18 minutes. For me, 15 minutes created the right consistency.
- These homemade Oreo cookies will last about two weeks in an airtight container at room temperature. You can also freeze for up to three months.


Chris says
Can never have enough Oreos!