This post may contain affiliate links. Please read my disclosure.
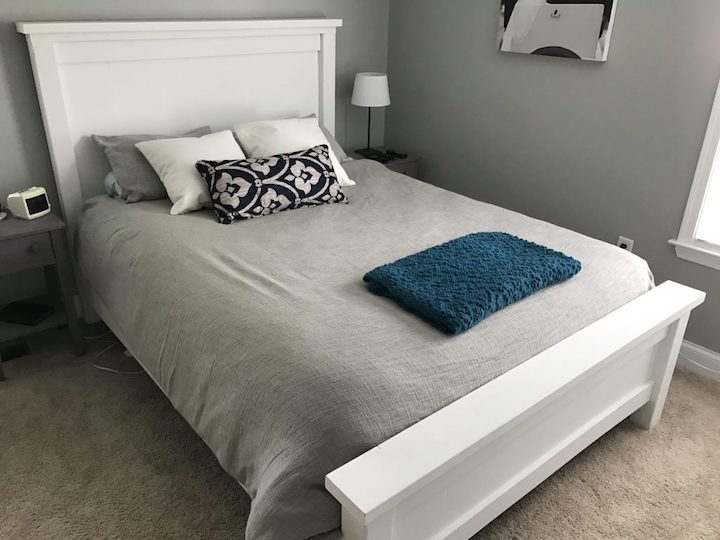
From Ana White's book, The Handbuilt Home, this DIY farmhouse bed was the first project I made for our house and is the centerpiece of our bedroom.
When I got into woodworking, I'm sure like most people, I started small. My first few projects were all things that I could easily pick up and carry around. Soon enough however, I was ready for the next step and that's where this DIY farmhouse bed comes in.
In early December 2016, Lauren and I put an offer on a house. While it wasn't finalized yet, I started envisioning making a ton of furniture for the house. When scouring the internet, I came across Ana White's blog. Her blog was all about making furniture as simple as possible with the tools most people have at home. I wasn't ready to make anything, but I kept note to go back to her site when ready.
And then Christmas came, and my brother and sister-in-law got me her book, not even knowing I was already following her site! Right then, the ideas started flying for what I should make first! And lo and behold, our house offer was accepted and we were scheduled to close in February. With the house official, I was ready to start making some furniture! Originally I wanted to go a little smaller to begin with, but Lauren really wanted a headboard. I had seen the farmhouse bed on Ana's site, but had marked that as a "for later" category. However with Lauren's persistence and the fact that the book had ready-made instructions I decided to tackle the farmhouse bed first! This bed was actually the first project Ana ever made and shared on her blog and I believe is her most popular project to date. It can be found here.
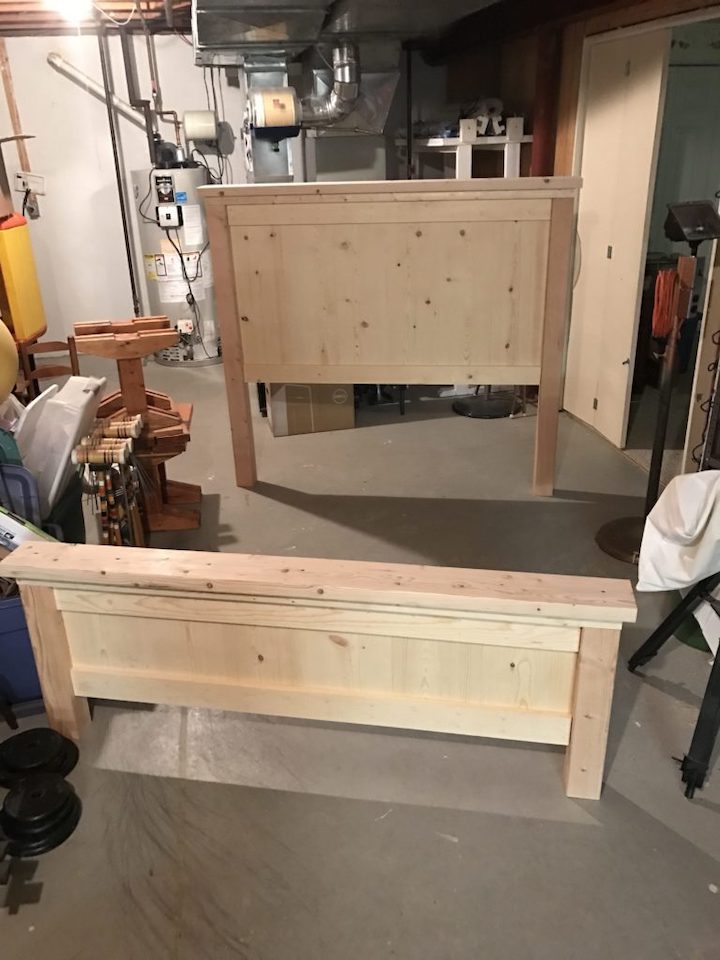
I don't have a ton of tools myself, so one weekend I went up to Lauren's parents and my father-in-law and I spent two days making this DIY farmhouse bed. As I mentioned previously, this was before I had this crazy idea of doing a blog so I didn't document a ton unfortunately. This was however a fairly easy project to make (easier than I thought it would be).
You do have to spend a fair amount on wood and a bed frame to go with it, but it's still much cheaper than buying a bed frame of this quality. Overall it was about $250 worth of materials. I couldn't be happier with this DIY farmhouse bed it turned out and is the centerpiece when entering our master bedroom now. Below are pictures of the instructions that can also be found online at her site. I'd definitely suggest buying it! Now go make a DIY farmhouse bed yourself!
DIY Farmhouse Bed Shopping List
- (5) 1" x 10" x 8'
- (2) 1" x 4" x 10'
- (2) 4" x 4" x 6'
- (2) 2" x 4" x 8'
- (2) 2" x 6" x 8'
- Titebond III wood glue
- 1 ¼" pocket hole screws
- 1 ¼" finish nails
- 2" screws
- 3" screws
- Queen-size metal bed-rail kit (I bought this as I didn't want legs to show)
Tools
Farmhouse Bed Cut List
- (6) - 1" x 10" @ 32" (headboard-panel boards)
- (6) - 1" x 10" @ 15" (footboard-panel boards)
- (4) - 1" x 4" @ 55 ½" (panel trim)
- (2) - 4" x 4" @ 54" (headboard legs)
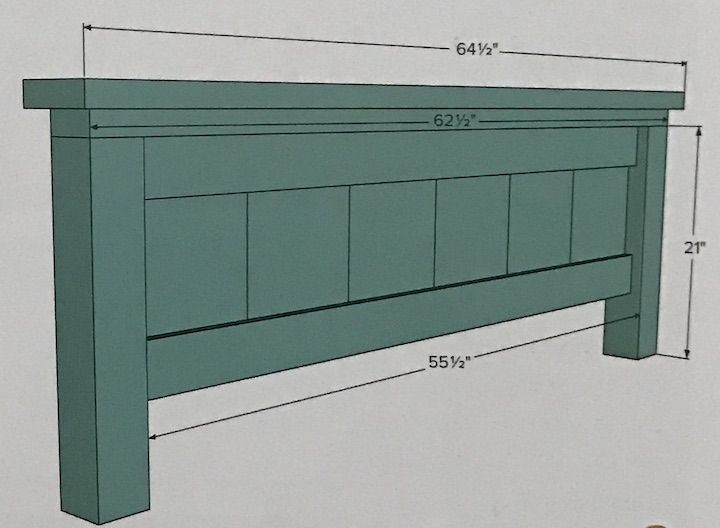
- (2) - 4" x 4" @ 21" (footboard legs)
- (2) - 2" x 4" @ 62 ½" (top of panel/legs)
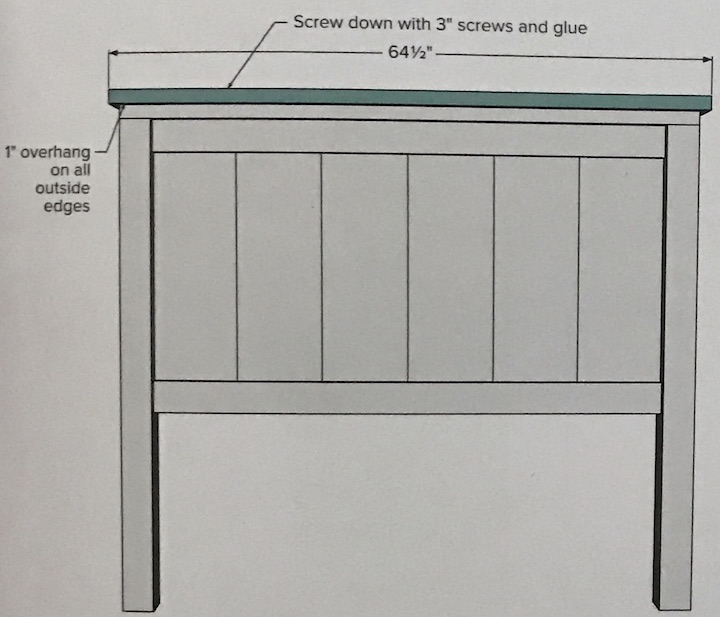
- (2) - 2" x 6" @ 64 ½" (header)
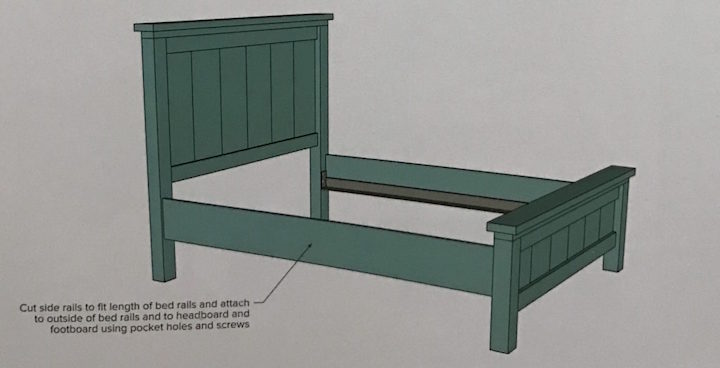
- (2) - 1" x 10" @ (cut to length of side rails which is optional)
Step 1:
Begin by sanding all of the wood. It's easier to sand before cutting down. Use 80, 150, and 220 grit sandpaper to make as smooth as possible.
Step 2:
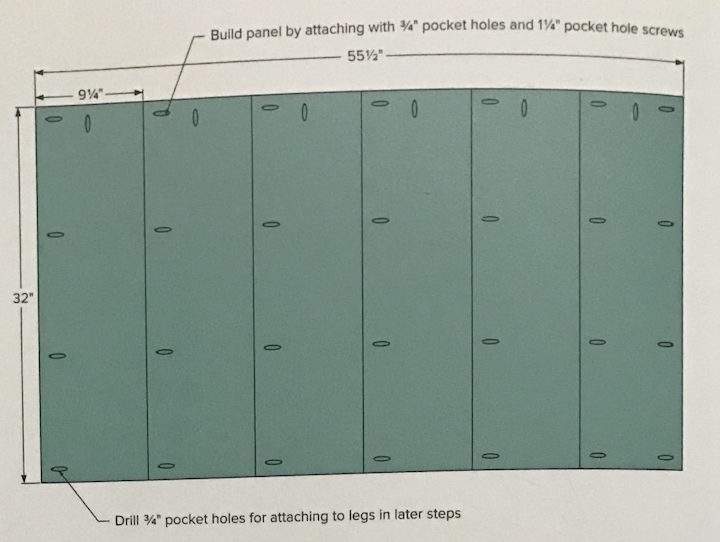
Cut 1x10s into 6 identical boards at 32". Drill ¾" pocket holes along the top and side edges of each panel. Put 6 panels together to ensure it is 55 ½" wide. If correct glue the sides and keep together with clamps while drilling 1 ¼" pocket hole screws into each pocket hole. We did 1 panel at a time and expect expanding from there until all 6 panels are glued and screwed together. You need to be careful with pocket holes as the wood can slide around when screwing the panels together. Cut 1x10s into 6 identical boards at 15". Repeat the process above of putting together.
Step 3:
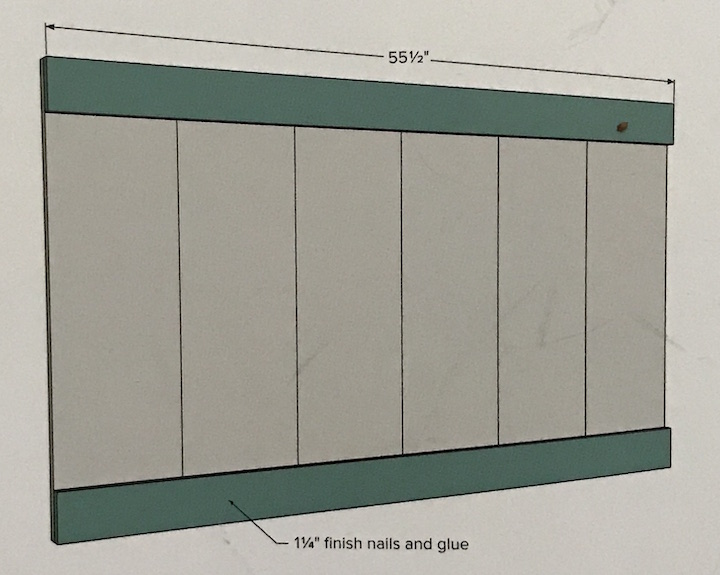
Cut 1x4s into 4 identical boards at 55 ½". Attach trim boards with glue and 1 ¼" finish nails to the front of the top and bottom headboard and footboard.
Step 4:
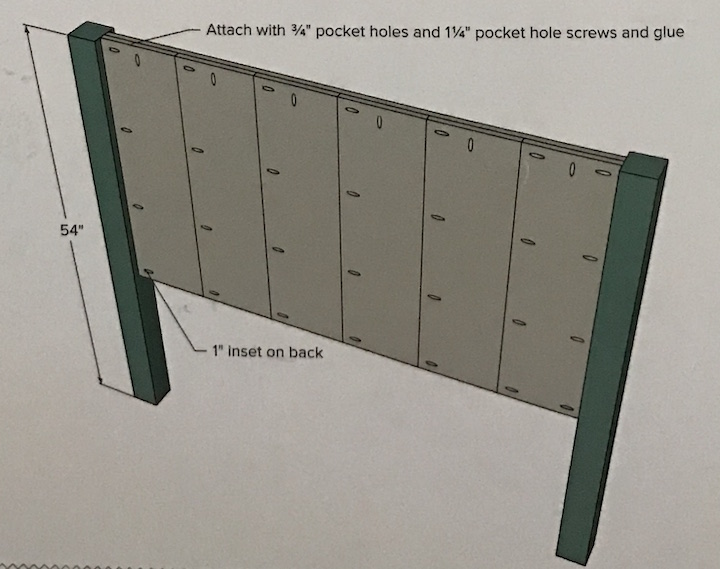
Cut 4x4s into 2 posts at 54" and 2 posts at 21". For headboard, with top flush, insert the panel with 1" space from back and attach through pocket holes previously drilled with 1 ¼" pocket holes screws and wood glue. Repeat for footboard.
Step 5:
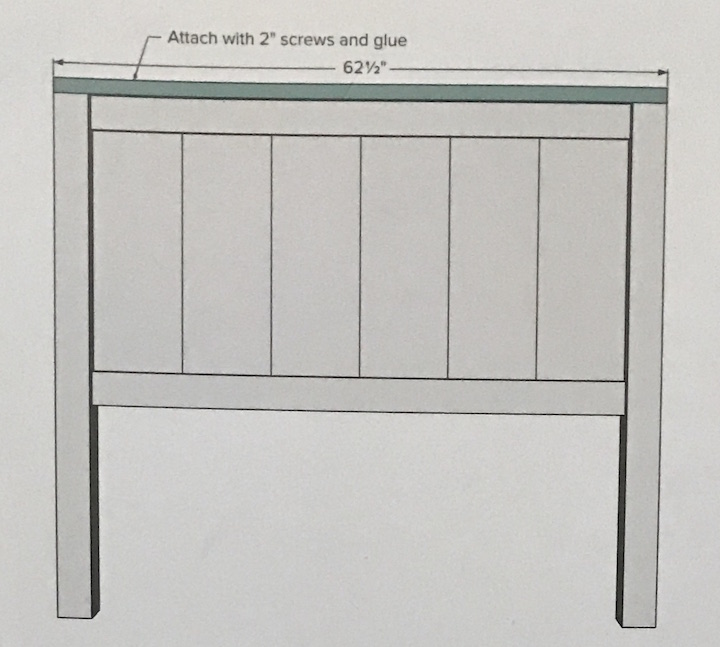
Cut 2x4s into 2 boards at 62 ½". Apply glue to top edge of headboard and footboard panels and legs and then attach the 2x4 top. Screw the 2x4 board into the 4x4 legs with 2" screws to keep secure.
Step 6:
Cut 2x6s into 2 boards at 64 ½". For headboard, mark the board 1" in from all outside edges of 2x6 and apply glue on top of the 2x4. Lay the 2x6 on top of 2x4 and attach with 3" screws. Repeat with the footboard.
Step 7:
Determine the height you want for the bed and attach the bed rails to the legs according to the bed-frame instructions.
Step 8:
Measure the 1x10 boards to the length of the bed rails or the distance between the headboard and footboard. Mine was 83". Attach the boards using ¾" pocket holes and 1 ¼" pocket hole screws to the legs of the headboard and footboard.
Step 9:
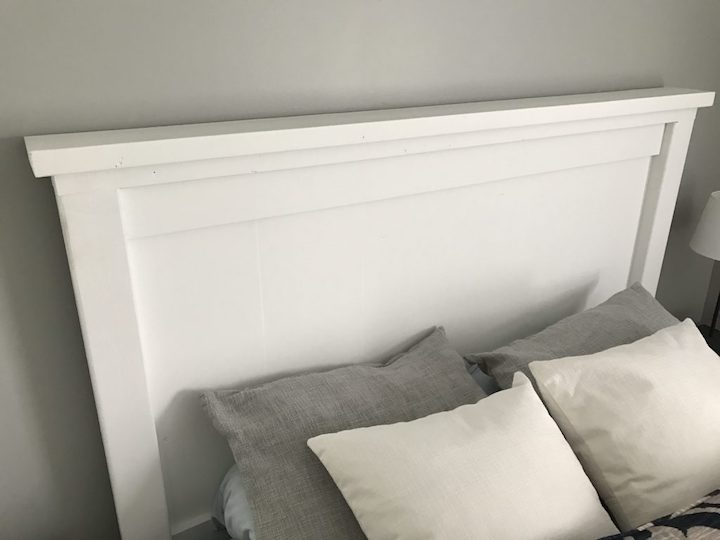
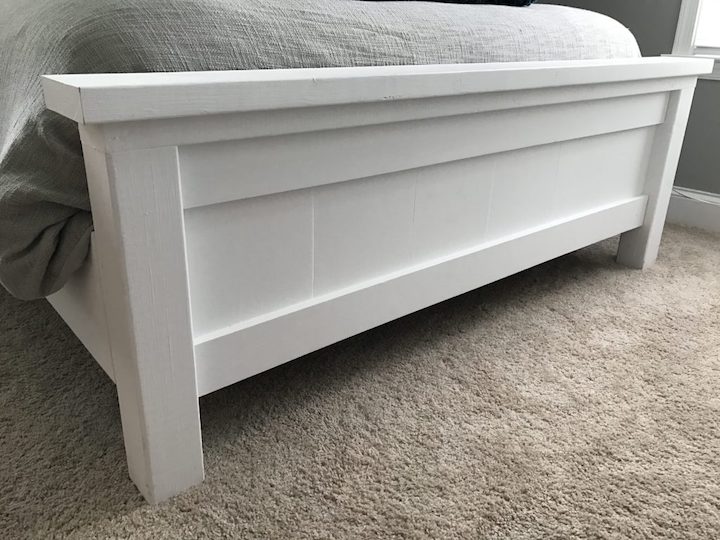
Paint or stain to your liking. I put a coat of primer on and then painted white.

Sylvia says
Your hand crafted bed will become a treasured family heirloom. It is priceless! So much better than "store bought".